Using and detecting C2 printer pivoting
-
 Alfie Champion
  James Coote
 - 2 Nov 2020
 Alfie Champion
  James Coote
 This post introduces the novel concept of Command & Control (C2) using print jobs, and demonstrates how this can be achieved using C3’s Print channel. It also explores the OPSEC considerations behind the use of this technique, and outlines the detection opportunities that it can create.
Esoteric C2 channels are an essential mainstay of covert engagements, and are increasingly important as blue teams become more adept at detecting traditional channels. Moreover, the C2 options available to operators post-exploitation have traditionally been rather limited, with the majority requiring direct connectivity between source and destination, and many being highly signatured. With the recent release of C3’s LDAP channel, F-Secure set about exploring how other elements of common IT infrastructure could be abused in this fashion, and so Printer C2 was born.
Using any local or network printer, C3 places new print job(s) on the queue in a Paused state, using the Document Name attribute as the data transfer mechanism. During testing it became apparent that the majority of print queues supported Document Names that were at least 1MB long, which is more than adequate for a responsive operator experience.
To prevent Relays from reading messages that are not destined for them, and in order for C3 to distinguish C3 jobs from legitimate printing jobs, two unique identifiers are appended to the job. The first is the name of the relay which should receive the message, and the second is used to identify C3 jobs. Both are user-defined and customisable. Once a message has been read it is then permanently deleted from the queue.
The jobs that C3 creates are not valid jobs, and even if they were not in a Paused state, would never trigger a physical printer action. In addition, printers in the Offline state could also be used to further reduce risk.
Getting a print channel up and running is relatively straightforward. It’s important to note that both sides of the channel must communicate with the same printer queue, and must be executed under the context of the same user or a user with the ability to modify other user’s jobs.
This post assumes you already have an existing foothold using C3. If not, please consult F-Secure’s Introduction to C3 post for instructions on how to deploy the supporting infrastructure.
Finding suitable printers is often trivial given their ubiquitous nature within organisations of all sizes. For a rough and ready approach, or if you have landed on a non-domain joined machine, nmap can be used.
nmap -p 9100,515,631 <IP> -oX printers.xml
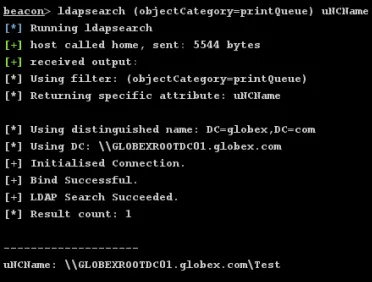
A better solution if running under the context of a domain user would be to discover print servers and printers using a simple LDAP query. Here we’re using @ajpc500’s LDAP searching Beacon Object File (BOF) to query Active Directory for print servers.
ldapsearch (objectCategory=printQueue) uNCName
Alternatively you can use PowerShell to query a remote computer for printers.
Get-Printer -ComputerName GLOBEXROOTDC01

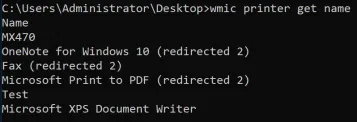
And, for completeness, you can also query local printers using WMI.
wmic printer get name
With the target printer selected, choose AddNegotiationChannel from an existing Relay in C3 and complete the following fields:
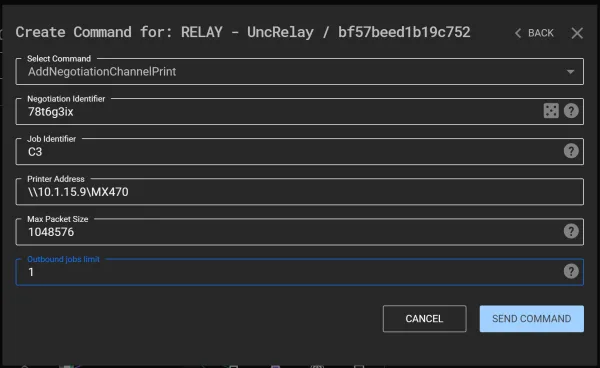
Select the newly created Channel icon and click New Relay. As all the pertinent fields should already be filled, go ahead and click Create and Download Relay. Once executed on the target system, C3 will negotiate input/output IDs and will establish your C2 channel.
Here is a video of the process, including the deployment of a beacon through the newly created channel.
Even with a limit of a single print job the channel is able to support multiple beacons, preserving operator agility.
Performance is improved even further when the number of print jobs is not limited. It should be noted that channel stability degrades significantly when attempting to transfer large (>100MB) files using unlimited print jobs , caused by the number of jobs C3 attempts to submit. The workaround for this is to limit the number of jobs to a more reasonable number.
To detect the use of printers for pivoting within an internal network, we have a number of areas we could focus on. Let’s take a look at a few detection opportunities presented on the endpoint, at a network level, and on the print servers that are handling the queued jobs.
As you’re probably familiar, when we print a file on Windows, we see the printer icon in the taskbar. Using C3 over printers is no different. Every ‘write’ event that requires a new job to be added to the print queue causes this icon to be presented.
![]()
Arguably, this isn’t a ‘detection’ per se, but as an operator we need to be conscious that an eagle-eyed user could spot it.
This gets even more troublesome when we target a printer that is offline (or indeed low on ink, paper, etc.). While the channel will still operate (i.e. we can still queue jobs and read them from another host), the compromised user will be notified that the printer is offline. An example message can be seen below.

These notifications can be disabled by modifying the following two registry keys, but this isn’t the default, and obviously presents its own detection opportunities:
HKCU\Printers\Settings\EnableBalloonNotificationsRemote
HKCU\Printers\Settings\EnableBalloonNotificationsLocal
The first thing we can look at are module load events. As we’ve done previously, we can use b33f’s SilkETW to capture our ETW telemetry. The following SilkService will provide what we need here:
 <SilkServiceConfig>
 <ETWCollector>
 <Guid>870b50e1-04c2-43e4-82ac-817444a56364</Guid>
 <CollectorType>kernel</CollectorType>
 <KernelKeywords>ImageLoad</KernelKeywords>
 <FilterValue>Image/Load</FilterValue>
 <OutputType>eventlog</OutputType>
 </ETWCollector>
 </SilkServiceConfig>
On launch, we can see that our Relay loads the “winspool.drv” DLL. A look at the Microsoft documentation shows this as the underlying module for adding print jobs.

Module load events also highlight each time the C3 Relay attempts to add a job to the print queue. Most notably we can see the repeated load and unload of “prnfldr.dll” and “PrintWorkflowProxy.dll” for each print job.

Of course, on a typical corporate endpoint there could be all manner of programs that are creating print jobs. Further, as an operator, we could make this more difficult by injecting into a process that would typically produce print jobs, such as a Microsoft Office application.
One means to start looking for anomalous jobs could be to filter out jobs that have been scheduled through the UI. Using SysInternals Process Monitor and performing an interactive print in Microsoft Word, we can see our “prntflr.dll” making an appearance again, but this time accompanied by “printui.dll”.

While the name is probably relatively self-explanatory, if we review the exports of this system DLL (in this case we’re using pestudio), we can see functions including “ConnectToPrintDlg”, which Microsoft documentation confirms “displays a dialog box that lets users browse and connect to printers on a network”.
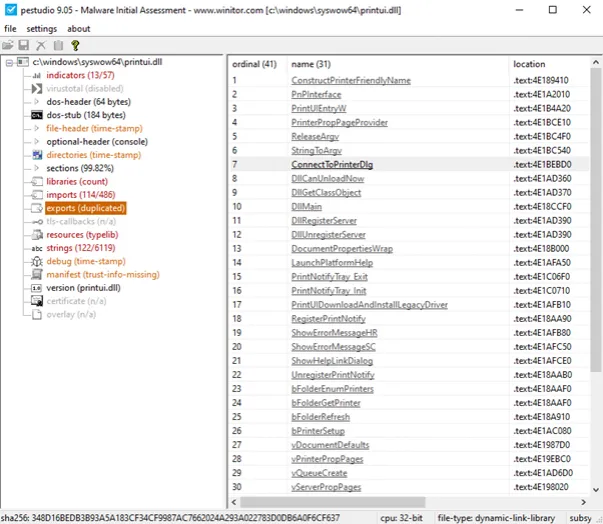
This is notably absent from the Relay’s module loads and evidence of the programmatic nature of our print job scheduling.
Taken from Microsoft’s specification documentation, “the Print System Remote Protocol is dependent on the RPC protocol. The Print System Remote Protocol does not specify methods for file transfer between client and server; therefore, the Server Message Block (SMB) Version 2.0 Protocol is the preferred protocol for all file transfer operations”.
The first thing we’ll need to do is capture the RPC logs, we can do this using the “Microsoft-Windows-RPC” ETW provider. For this exercise we can use the built-in logman utility. We can save the RPC logs to a file called “Print-Job-RPC” with the following command:
logman start Print-Job-RPC -p Microsoft-Windows-RPC 0xffffffffffffffff win:Informational -ets
With this RPC capturing taking place, we can then execute our C3 print channel relay. When the connection has been established, we can stop the capture with the following command:
logman stop Print-Job-RPC -ets
We can also convert this ETL file to an Event Viewer compatible EVTX file with the following command:
tracerpt Print-Job-RPC.etl -o Print-Job-RPC.evtx -of EVTX
Immediately we can see the volume of data we’re capturing with even the short window we ran our collection for (I had ~80,000 events in about 20 seconds!). For our purposes we can focus on EID 5s, these are RPC client calls.
We can then search for events relating to the operating system’s print service. Based on the specification, we can see that the Print System Remote Protocol (aka MS-RPRN) has an interface UUID of {12345678-1234-ABCD-EF00-0123456789AB}. Below, we can see the communication between our Relay process and the local print service.
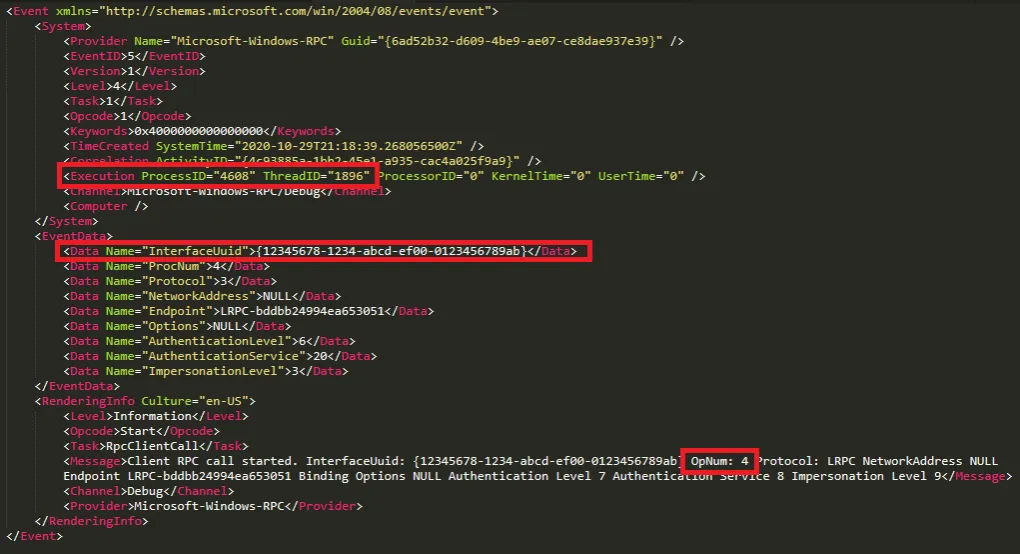
Looking at the entry above, we can see several crucial pieces of information:
The Process ID making the RPC call.
The Interface UUID (confirming we’re seeing communication with the print service).
The OpNum confirming the functions that are being called against the interface (i.e. the creation and deletion of print jobs).
Some notable RPC functions for our C3 channel include the below:
Method
Description
OpNum
RpcEnumJobs
Retrieves information about a specified set of print jobs for a specified printer.
Opnum 4
RpcAddJob
Defines a new print job.
Opnum 24
The above OpNum of 4 shows us that the Relay process is requesting details of the jobs currently on the print queue. We can also see the RPC call with OpNum 24 below, where our Relay is adding a job to the print queue.
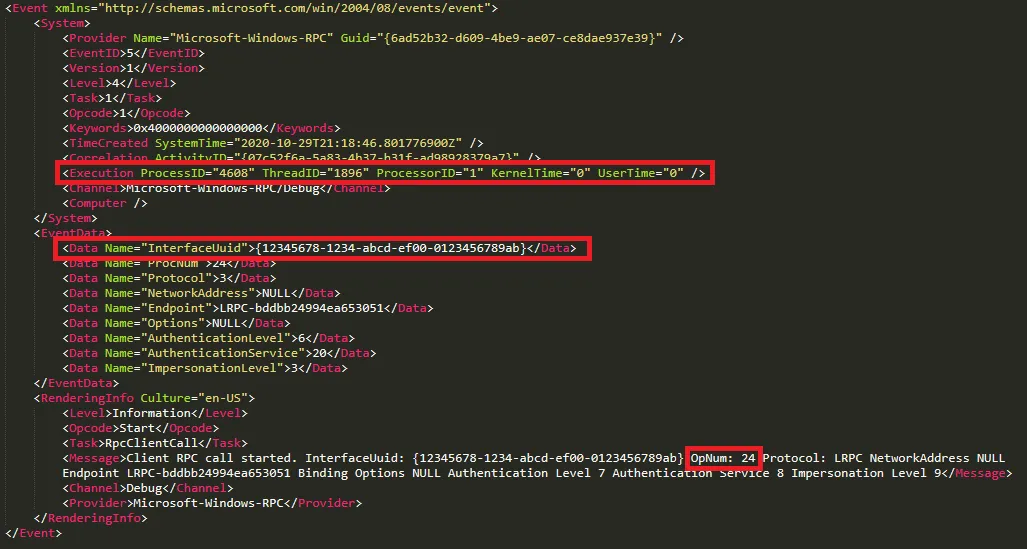
Without delving into the internal system architecture of the Print Services system, at a high-level, our ‘client application’ (the Relay) communicates with a local print spooler service, which is what we can see above – note the mention of Lightweight RPC (LRPC), used for communication between local processes.
From here our local spooler service will communicate using RPC (over SMB, as we saw in the specification) to the remote spooler service of our print server. The Print System Asynchronous Remote (MS-PAR) protocol server interface is identified by the UUID {76f03f96-cdfd-44fc-a22c-64950a001209}. Looking below, we can see the RPC call to the print server.
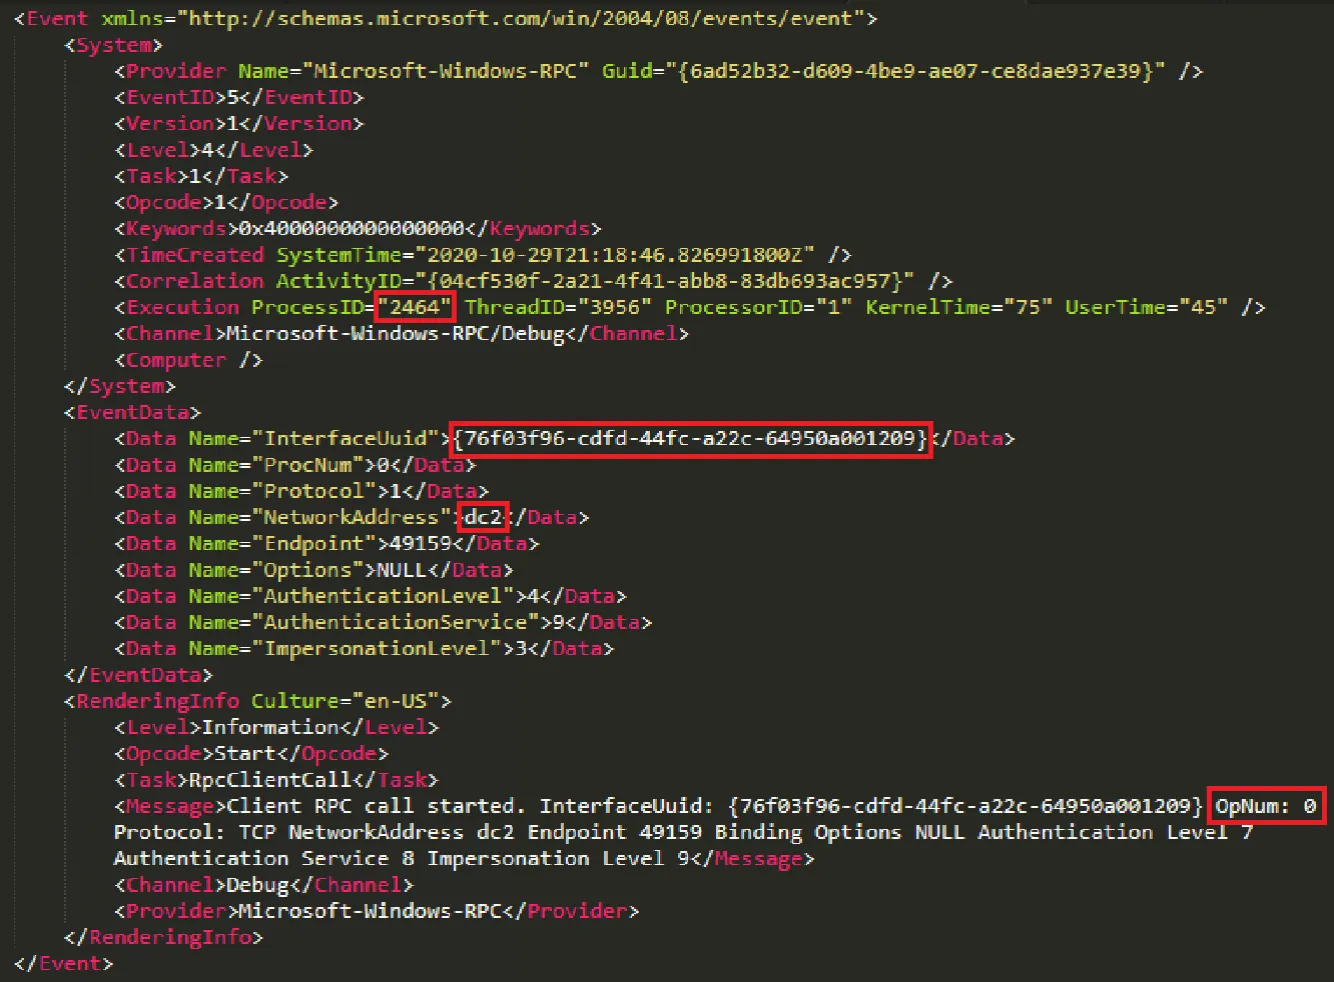
Note here, we can see the “DC2” network address, our lab environment print server. We can see the MS-PAR interface UUID and we can see the OpNum of zero, the “RpcAsyncOpenPrinter” function, which retrieves a handle to a specified printer. As we might expect given the printer system architecture, the originating PID of the Relay has gone, and we are now seeing the process ID of the print spooler service of our local host.
While we won’t go further with this detection, we can see the raw telemetry available here (albeit significant volumes of it) that allows us to ascertain which processes are initiating print jobs.
For further reading, this blog by Jonathan Johnson, Jared Atkinson and Luke Paine gives a great overview of how we could make further use of RPC telemetry.
As outlined in the MS-RPRN specification above, our RPC calls to a remote server are going to be made over SMB. Looking at a packet capture of the communication, we can see the connection to the print server and notably the ‘OpenPrinterEx’ request.
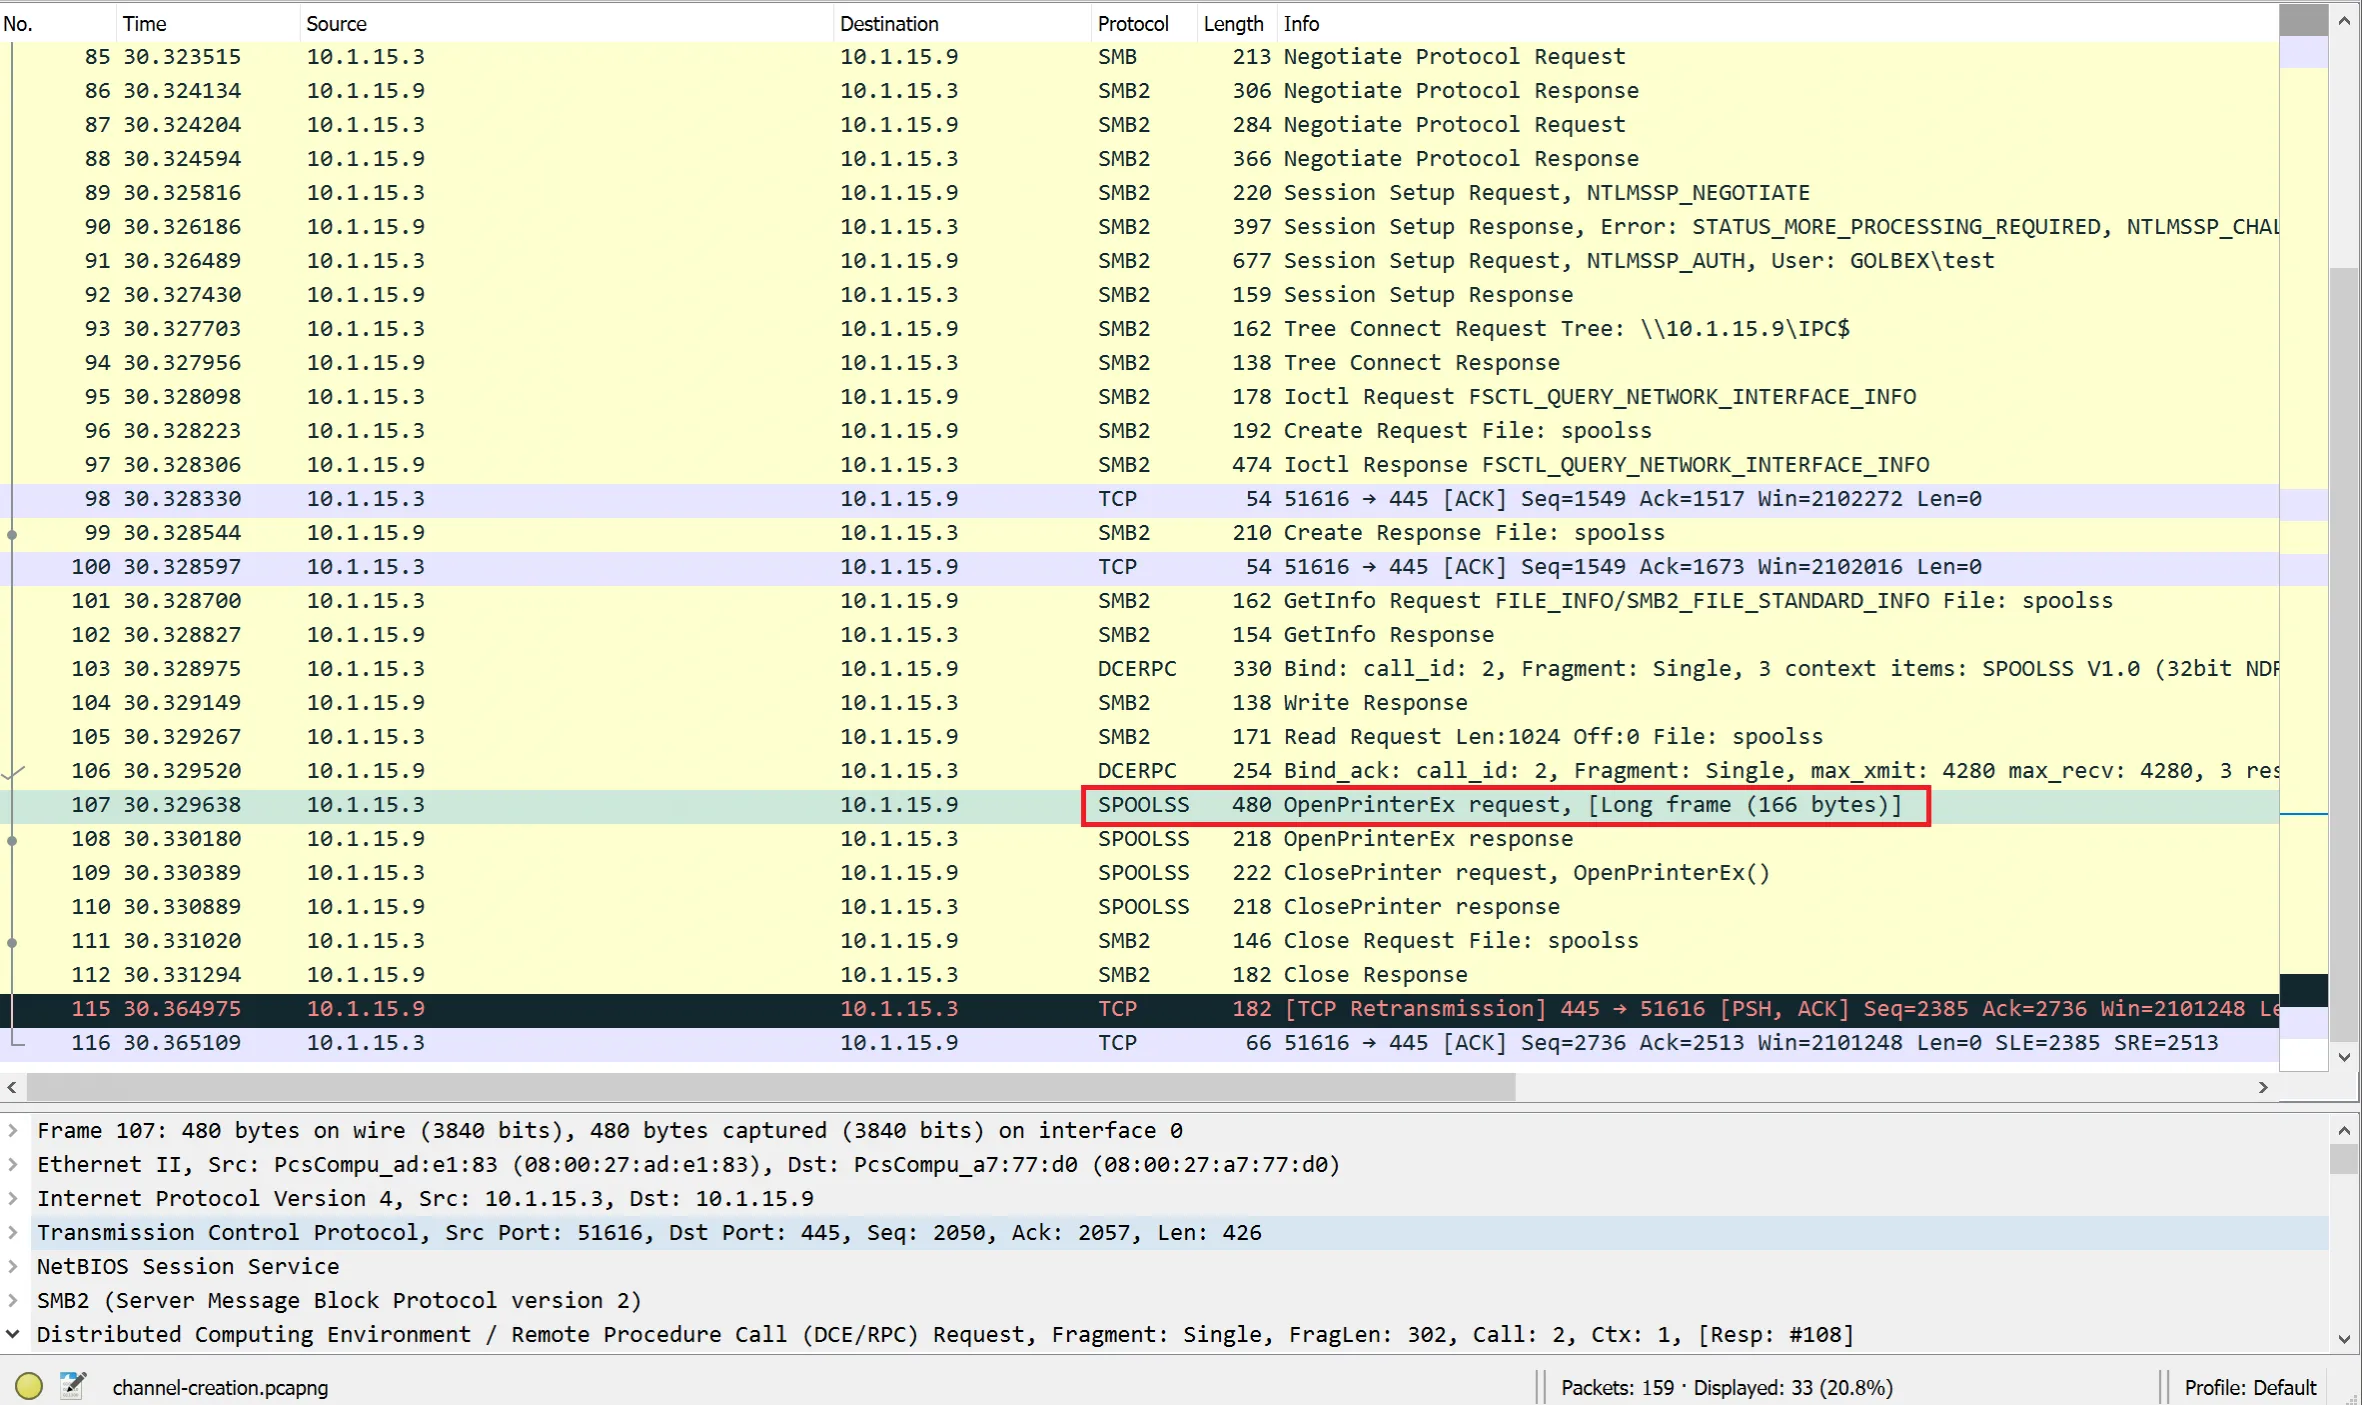
Clearly, moving from the endpoint we lose the process-level visibility, but we can still see our endpoint performing printing activity. This could be used to identify beaconing behaviour or large volumes of print traffic from one or more hosts, suggesting printer pivoting.
Lastly, on the print server itself, we can use the “Microsoft-Windows-PrintService/Operational” log to track print jobs. This can be enabled with Group Policy, as well as with the following command:
wevutil.exe sl 'Microsoft-Windows-PrintService/Operational' /enabled:true
The ‘Microsoft-Windows-PrintService/Operational’ log provides us with the following notable event IDs:
By default, we don’t have visibility of one of the most anomalous aspects of this print activity - the length of job names that actually facilitate the data transfer.
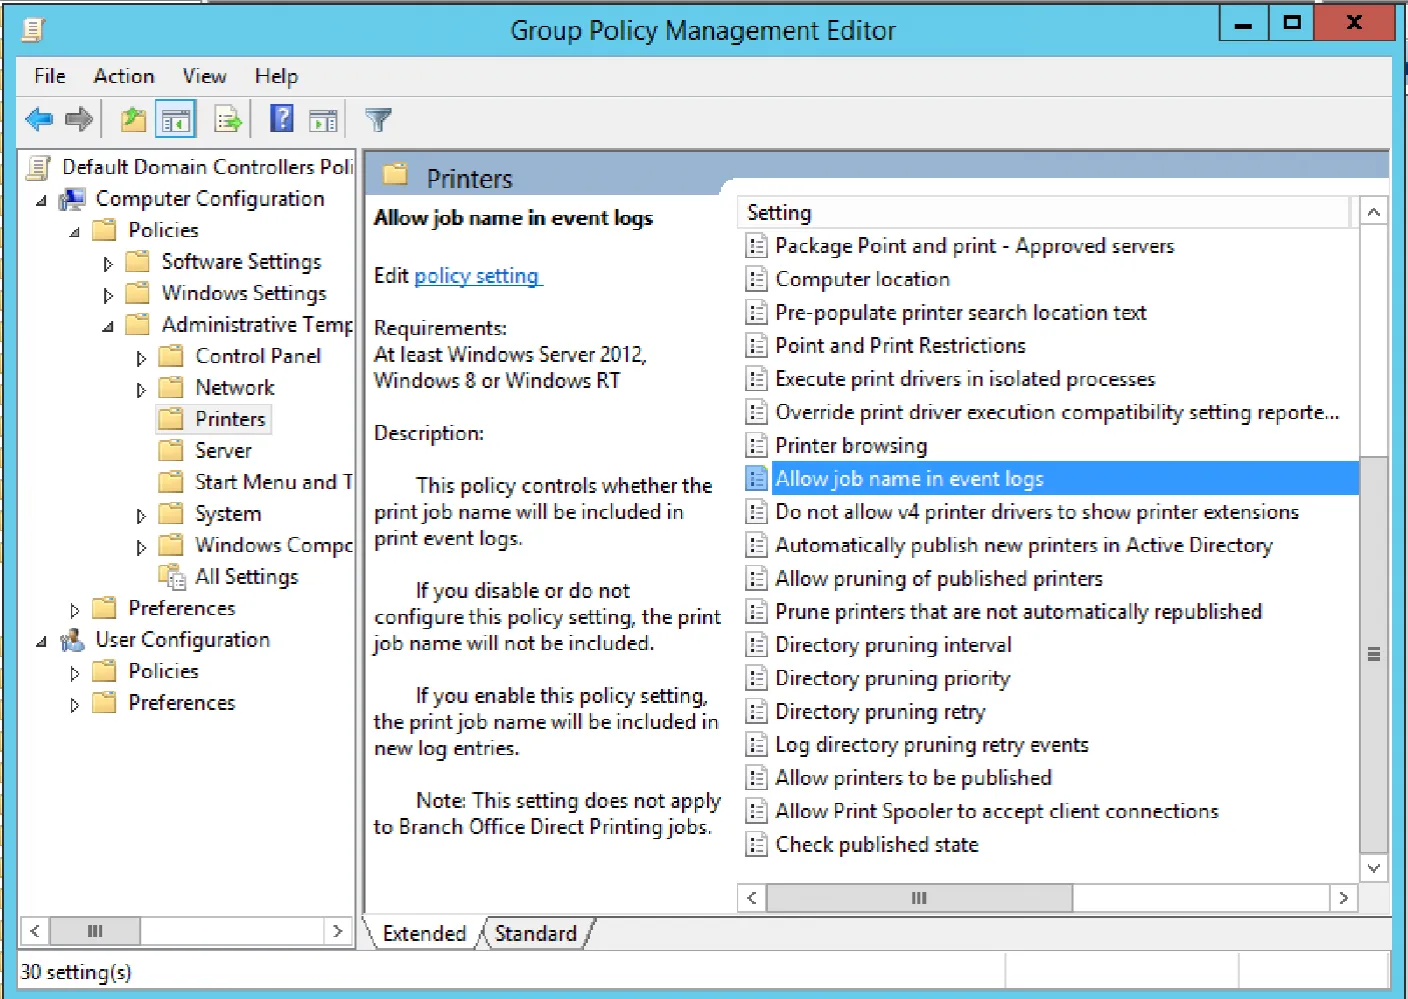
To log job names, we need to modify group policy enabled the following option:
Computer Configuration > Policies > Administrative Templates > Printers > Allow job name in event logs
Of course, there may be privacy concerns associated with this log fidelity, but we can safely enable it in our lab environment, as seen below:
Now, we can take a look at the event logs we’ve generated:
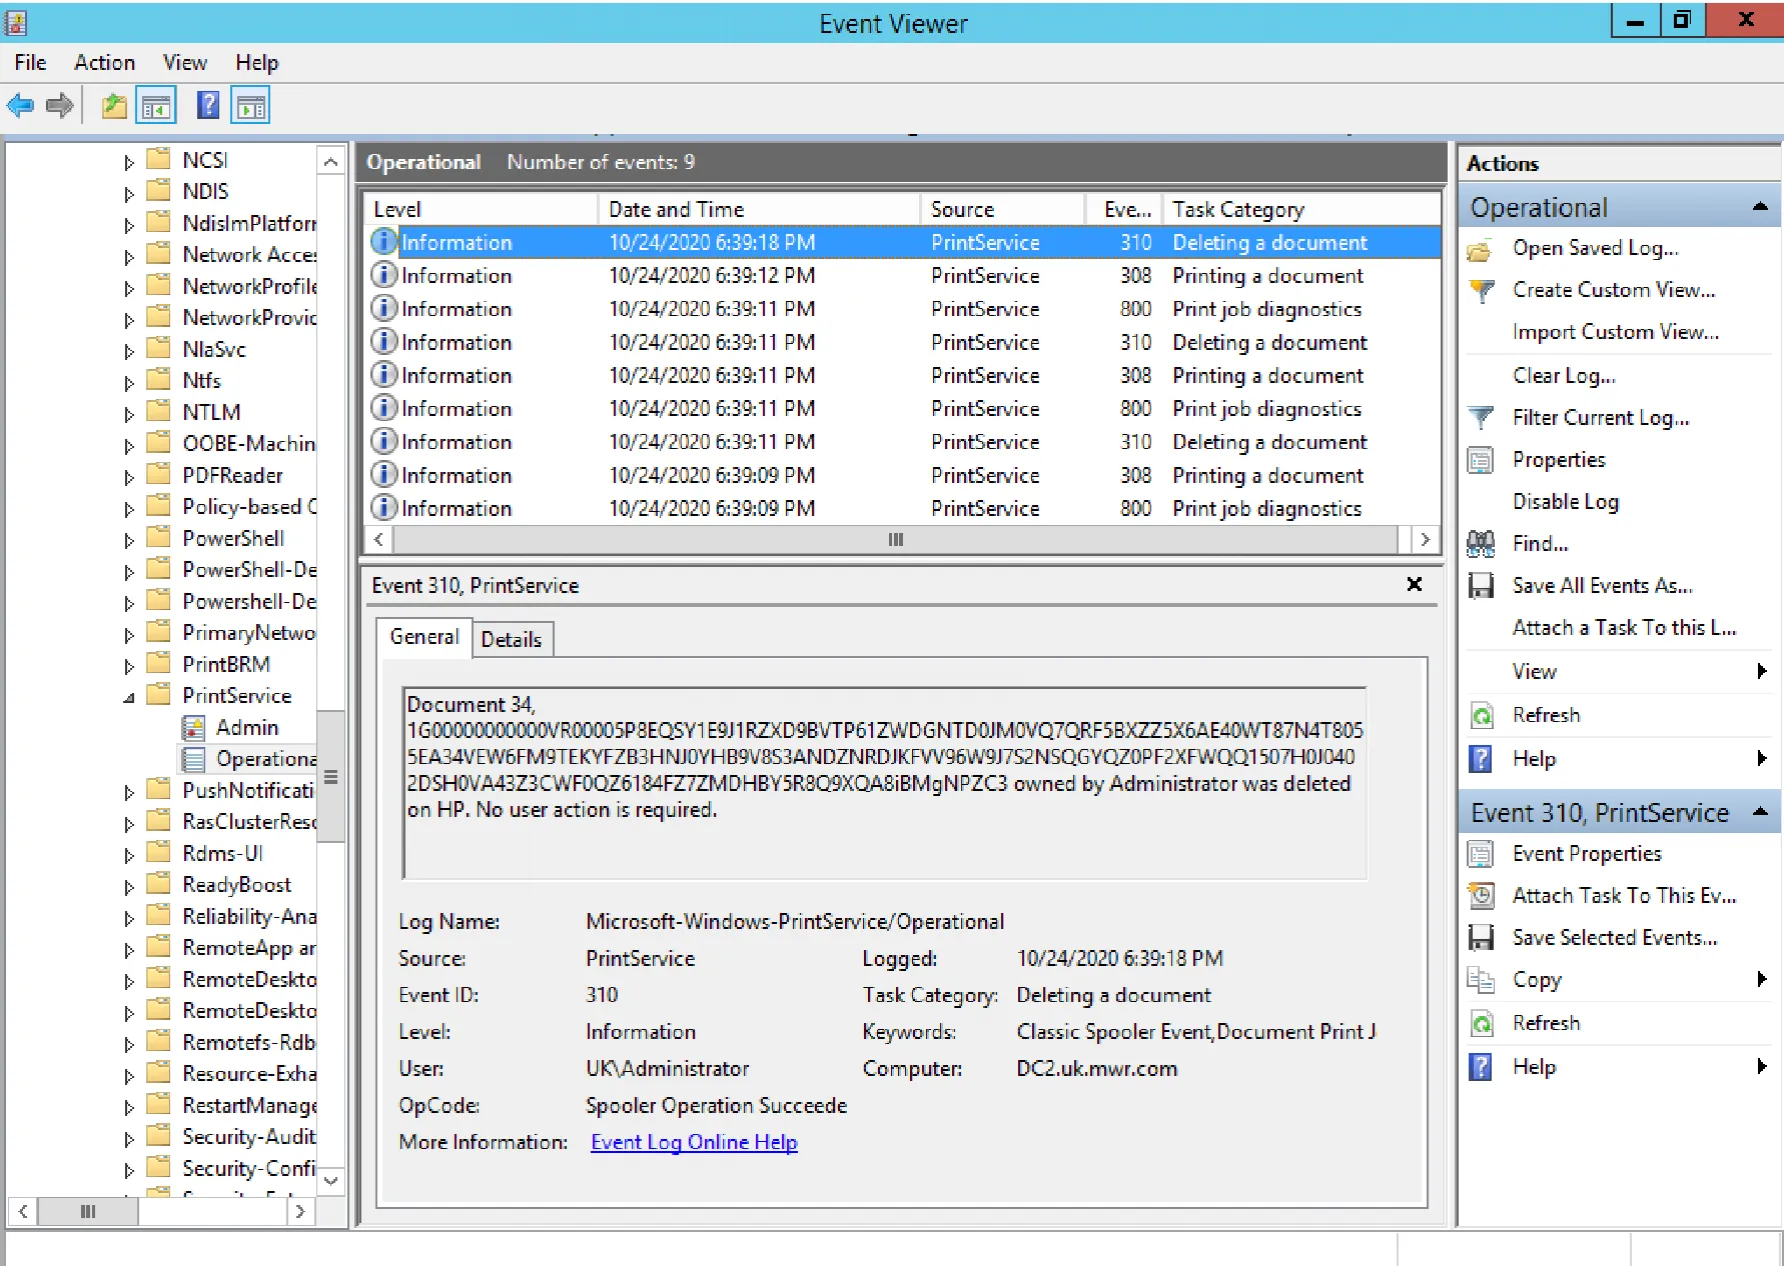
As we can see above, the EID 310 (Deleting a document) event here provides us with the name of the job added to the print queue. Given that these file names can be up to 1MB in size, and are the means by which C3 sends its Base32-encoded message content, the staging of a Cobalt Strike beacon (~200kb) or the exfiltration of data would stand out here.
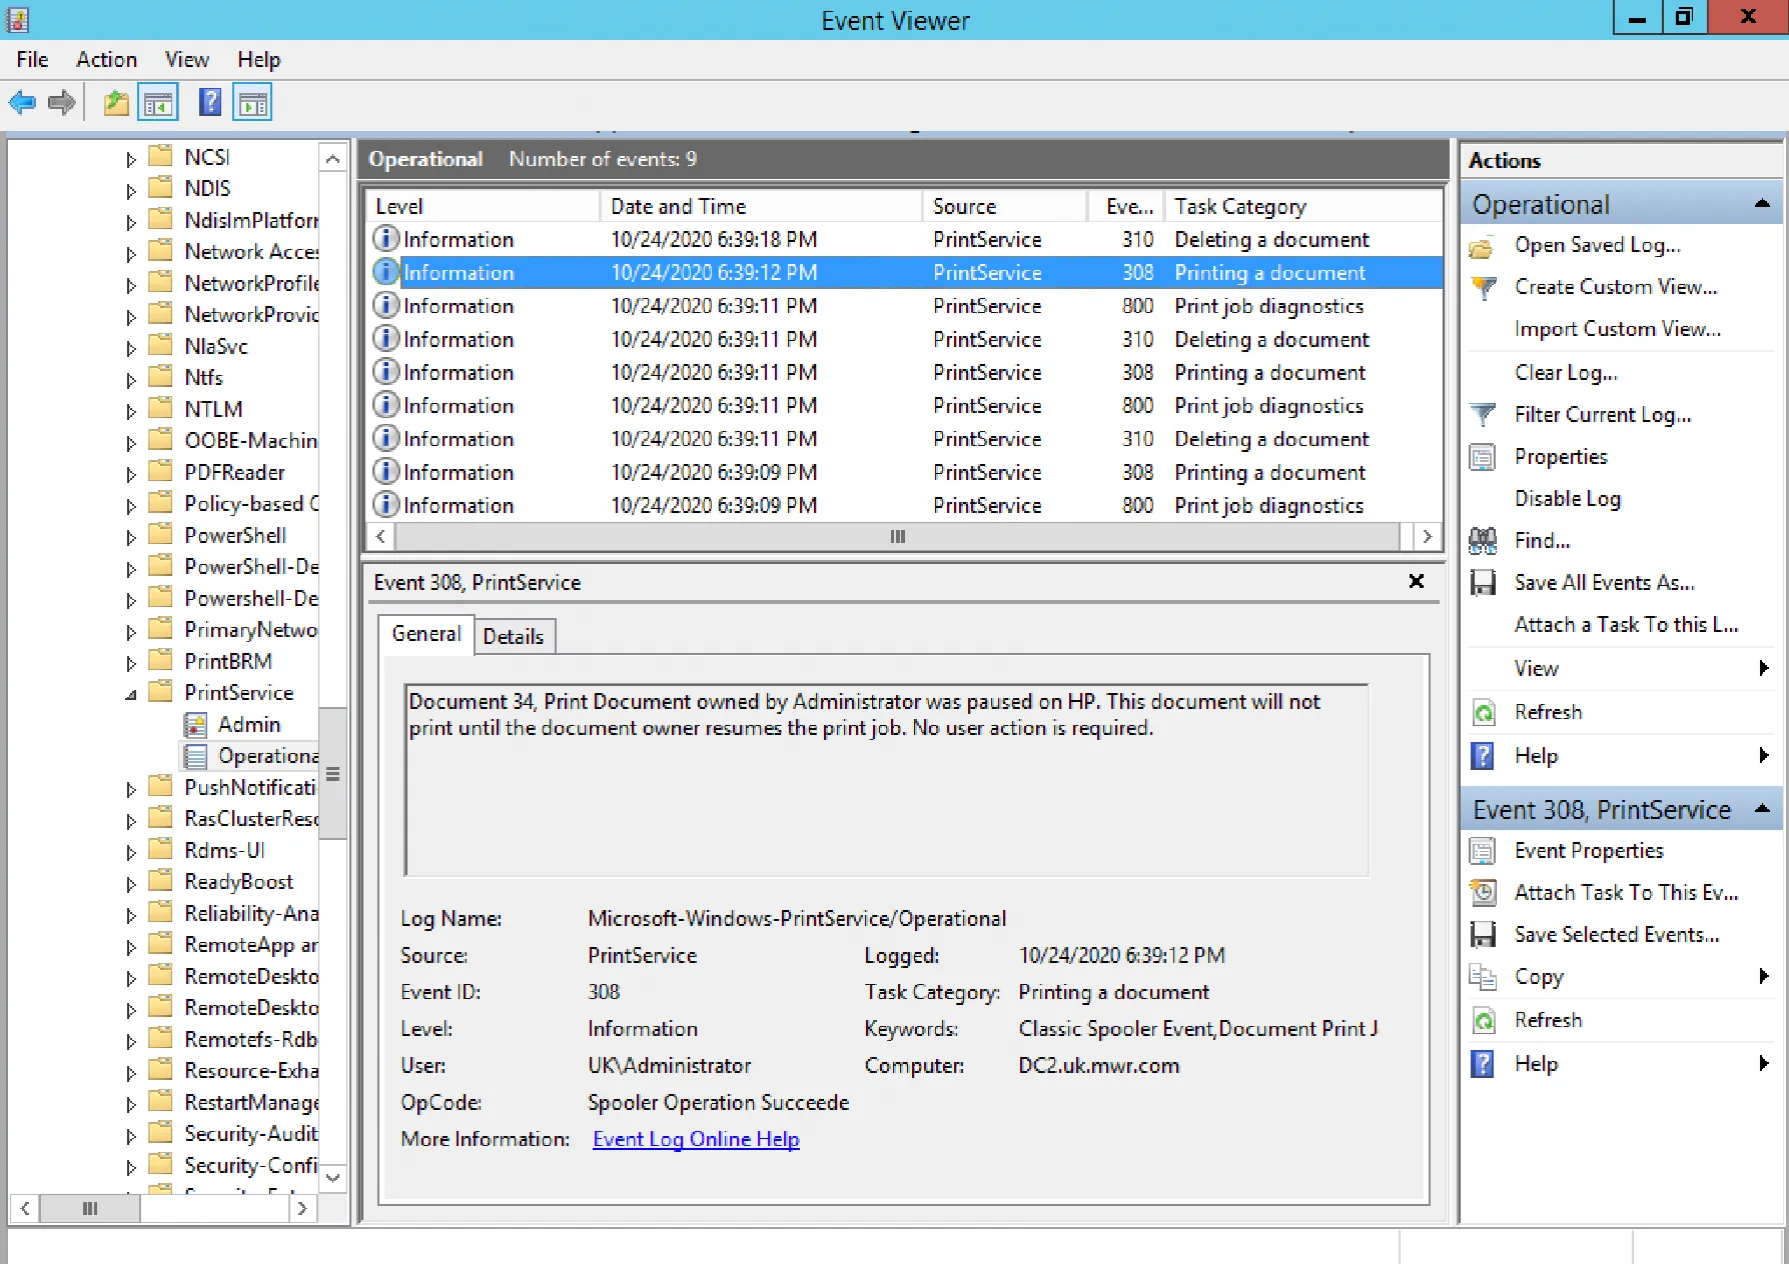
Further, observing the log pattern in the above screenshot, we can see a combination of EID 800 (spooling), 308 (printing) and 310 (job deletion). Crucially here, if we look at the following screenshot, we can see that the EID 308 events evidence the fact that each of our jobs is set in a paused state. Continuous communication between two relays therefore generates a volume of paused print jobs and subsequent deletions.
As we’ve observed, there are plenty of indicators of printer pivoting. Arguably the most effective being the Base32-encoded content of the document names added to the print queue, exposed by our ‘Microsoft-Windows-PrintService/Operational’ log. With suitable telemetry at our disposal however, we could also hunt for suspicious activity on our endpoints and within network logs.